
Peppermint Bark has become one of my most treasured holiday traditions at Recipesrealm. Hi there! I’m Lisa, and I still remember the first time I made this festive treat during a chaotic December when I needed a last-minute gift for my daughter’s teachers. With just a few simple ingredients and minimal time in the kitchen, I created something that looked professionally crafted and tasted absolutely divine. The combination of rich chocolate layers and refreshing peppermint candy creates a flavor explosion that has become synonymous with the holiday season in our home.
Are you tired of spending hours on complicated holiday desserts that require endless steps and specialty equipment? Do you want to create impressive gifts without breaking the bank or your schedule? This easy Peppermint Bark recipe solves all those problems. In just 20 minutes of active preparation time, you’ll have a stunning, delicious treat that looks like it came from an expensive boutique candy shop.
As someone who has been perfecting dessert recipes for over a decade at Recipesrealm, I’ve tested countless variations of this classic treat. I’ve learned the secrets to achieving that perfect chocolate snap, the ideal ratio of peppermint to chocolate, and the technique that prevents your layers from separating. This recipe represents years of experimentation condensed into one foolproof method.
In this comprehensive guide, you’ll discover everything you need to master Peppermint Bark: why this particular method works better than others, how to select quality chocolate, ingredient preparation secrets, step-by-step instructions with professional tips, flavor variations for different preferences, serving suggestions that will impress your guests, and answers to the most common questions I receive about this beloved holiday treat.
Why This Peppermint Bark Recipe Works
This Peppermint Bark recipe has become a staple at Recipesrealm because it combines simplicity with spectacular results. Unlike complicated holiday desserts that require precise timing and advanced techniques, this treat is forgiving, affordable, and incredibly versatile.
Key reasons this recipe succeeds:
- Uses affordable, easy-to-find ingredients: You only need three main components—dark chocolate, white chocolate, and peppermint candies. No exotic ingredients or specialty items that require trips to multiple stores. Most grocery stores carry everything you need in their regular aisles, especially during the holiday season.
- Minimal active time for maximum impact: With just 20 minutes of hands-on work, you can create enough Peppermint Bark to fill dozens of gift bags. The chocolate does most of the work as it sets, meaning you can multitask and prepare other holiday treats or wrap presents while it firms up in the refrigerator.
- Perfect for beginners and experts alike: Whether you’re new to candy-making or an experienced home cook, this recipe delivers consistent results. The technique is straightforward enough for children to help with, making it an excellent family activity during the holiday season.
- Incredible versatility for gifting and serving: Peppermint Bark works as hostess gifts, teacher appreciation treats, party favors, dessert table additions, or cookie exchange contributions. Break it into large shards for dramatic presentation or smaller pieces for snacking—it always looks impressive.
- Make-ahead convenience: This treat actually improves with a day or two of rest as the peppermint flavor mellows into the chocolate. You can make it up to two weeks in advance and store it properly, freeing up your schedule during the busiest holiday days.
Choosing the Right Chocolate for Peppermint Bark
The foundation of exceptional Peppermint Bark lies in selecting quality chocolate. This isn’t the time to grab the cheapest option at the store—the chocolate quality directly impacts the final taste, texture, and appearance of your bark.
Best Chocolate Types for This Peppermint Bark Recipe
Dark Chocolate (Bottom Layer): I recommend using dark chocolate with 60-70% cacao content for the base layer. This percentage provides rich chocolate flavor without being too bitter, creating the perfect contrast with the sweet white chocolate and peppermint. Brands like Ghirardelli, Guittard, or Callebaut consistently deliver excellent results. Avoid chocolate chips for this layer, as they contain stabilizers that prevent smooth melting.
White Chocolate (Top Layer): Quality white chocolate is crucial because it’s the most visible layer and carries the peppermint flavor. Look for white chocolate that lists cocoa butter as the first ingredient, not palm oil or other vegetable fats. True white chocolate has a creamy ivory color and silky texture. Brands like Lindt, Green & Black’s, or Baker’s Premium work beautifully. Again, skip the white chocolate chips—they won’t melt smoothly enough.
Buying Tips for Peppermint Bark Chocolate
Look for chocolate bars or baking chocolate discs: These melt more evenly than chips and create that professional glossy finish. Bar chocolate should snap cleanly when you break it—this indicates proper tempering and quality cocoa butter content.
Check the ingredient list carefully: The first ingredient should be cocoa, cocoa butter, or cacao for dark chocolate, and cocoa butter for white chocolate. Avoid products with lots of additives, artificial flavors, or hydrogenated oils.
Consider buying chocolate from the baking aisle: While chocolate bars from the candy aisle can work, baking chocolate is specifically formulated for melting and creates superior results for Peppermint Bark. It’s also often sold in larger quantities at a better price point.
Ask your specialty food store for recommendations: If you have access to a store like Whole Foods, Trader Joe’s, or a local chocolate shop, the staff can direct you to their best melting chocolates specifically suited for bark-making.
Substitutions for Peppermint Bark
Budget-friendly option: If premium chocolate isn’t in your budget, use a combination of good-quality chocolate bars (not chips) from your regular grocery store. The recipe will still work, though the flavor won’t be quite as rich.
Allergen considerations: For dairy-free Peppermint Bark, use dairy-free dark chocolate and dairy-free white chocolate alternatives made with coconut milk or oat milk. Brands like Enjoy Life or Hu Kitchen offer excellent options.
Intensity preferences: If you find dark chocolate too bitter, swap it for semi-sweet or milk chocolate instead. The bark will be sweeter overall, which some people prefer, especially when making it for children.
Ingredients & Prep for Peppermint Bark
Proper preparation is the secret to smooth, glossy Peppermint Bark that looks professionally made. Taking a few extra minutes during prep prevents common problems like seized chocolate, separated layers, or sticky texture.
Essential Ingredients for Peppermint Bark
Chocolate Components:
- 12 ounces high-quality dark chocolate (60-70% cacao), roughly chopped
- 12 ounces high-quality white chocolate, roughly chopped
- 1 teaspoon coconut oil or vegetable shortening (optional, for smoother melting)
Peppermint Elements:
- ¾ cup crushed peppermint candies or candy canes (about 10-12 standard candy canes)
- ½ teaspoon peppermint extract (pure, not imitation)
Tools and Supplies:
- Rimmed baking sheet (9×13 inches)
- Parchment paper or silicone baking mat
- Two microwave-safe bowls or double boiler setup
- Rubber spatula
- Rolling pin or heavy object for crushing candy
- Plastic zip-top bag
Peppermint Bark Prep Essentials
Preparing your workspace: Line your baking sheet with parchment paper, ensuring it lies flat without wrinkles. Wrinkles will create uneven chocolate layers and make it harder to break into clean pieces later. If using a silicone mat, make sure it’s clean and completely dry—any moisture will cause the chocolate to seize.
Crushing peppermint candies for Peppermint Bark: Unwrap your candy canes and place them in a heavy-duty zip-top bag. Seal it almost completely, leaving a small opening for air to escape. Use a rolling pin to crush the candies, starting with gentle taps and progressing to firmer pressure. You want a mixture of fine powder and small chunks—the variety creates visual interest and different texture experiences. Crush them about 20 minutes before you need them to allow any moisture from the air to dissipate.
Organizing your ingredients: Measure and prepare everything before you begin melting chocolate. Once melted, chocolate needs to be worked with quickly, and scrambling for ingredients can result in the chocolate setting too soon or developing an undesirable texture. Have your crushed peppermints in a small bowl, your extract measured out, and your spatulas within easy reach.
Peppermint Bark Pantry Staples
Oils and fats: A small amount of coconut oil or vegetable shortening helps chocolate melt smoothly and creates a silkier texture. This is especially helpful if you’re working in a dry climate or with chocolate that’s slightly older. Never use butter—the water content can cause chocolate to seize.
Flavor enhancers: Pure peppermint extract intensifies the minty flavor without adding moisture. Start with less than you think you need—you can always add more, but you can’t remove it once it’s mixed in. The extract goes into the white chocolate layer only.
Temperature considerations: Bring your chocolate to room temperature before melting if it’s been stored in a cold place. Chocolate that’s too cold can develop condensation when exposed to warm air, and that moisture will ruin the melting process.
Step-by-Step Cooking Instructions for Peppermint Bark
Follow these detailed steps for perfect Peppermint Bark every time. The key is patience—rushing the process leads to separated layers and dull-looking chocolate.
Pre-Cooking Prep for Peppermint Bark
Step 1: Prepare your baking sheet by lining it completely with parchment paper. Use a tiny bit of cooking spray in the corners to help the parchment stay in place. Ensure the parchment extends slightly up the sides of the pan—this makes removal easier after the chocolate sets.
Step 2: Roughly chop your dark and white chocolate into small, uniform pieces. Consistent size is important because it ensures even melting. Chunks that are too large won’t melt completely, while tiny shards can burn before larger pieces are ready.
Step 3: Set up your melting station. If using a microwave, have your two microwave-safe bowls ready. If using a double boiler, bring water to a gentle simmer in the bottom pot before adding your chocolate bowl on top. The water should never touch the bottom of the chocolate bowl, and the heat should be low enough that you see only gentle steam, not rolling bubbles.
Step 4: Crush your peppermint candies and have them ready in a small bowl nearby. Reserve about 2 tablespoons of the finest peppermint powder to sprinkle on top at the very end—this creates a beautiful snowy effect.
Cooking Method for Peppermint Bark
Melting the dark chocolate layer:
Step 1: Place chopped dark chocolate in a microwave-safe bowl. Microwave on 50% power for 30 seconds, then remove and stir. Repeat this process, stirring after each 30-second interval, until the chocolate is about 75% melted. The residual heat will melt the remaining pieces as you stir—this prevents overheating.
Alternative double boiler method: Place dark chocolate in the top of a double boiler over barely simmering water. Stir constantly with a rubber spatula until completely melted and smooth, about 5-7 minutes. Remove from heat immediately.
Step 2: Once smooth and glossy, pour the melted dark chocolate onto your prepared baking sheet. Use an offset spatula or the back of a spoon to spread it into an even layer, about ¼-inch thick. Don’t spread it too thin, or it will be difficult to handle later.
Step 3: Refrigerate the dark chocolate layer for 15-20 minutes until firm to the touch but not completely hard. You should be able to press it gently without leaving a fingerprint, but it shouldn’t be rock-solid yet. This semi-firm state helps the white chocolate layer adhere properly.
Melting the white chocolate layer:
Step 4: While the dark chocolate chills, melt the white chocolate using the same method you used for the dark chocolate. White chocolate is more delicate and burns easily, so use 50% power and stir more frequently—every 20 seconds in the microwave or constant stirring in the double boiler.
Step 5: Once the white chocolate is completely melted and smooth, add the peppermint extract and stir thoroughly to distribute the flavor. Taste a small amount (carefully, it’s hot!) and add more extract if desired, but remember that the flavor intensifies as it cools.
Step 6: Remove the baking sheet with the dark chocolate from the refrigerator. Immediately pour the white chocolate over the dark chocolate layer, starting in the center and working outward. Use your spatula to spread it evenly, making sure it covers the dark chocolate completely. Don’t worry if you can see slight variations in thickness—this adds to the handmade charm.
Step 7: Working quickly while the white chocolate is still wet, sprinkle the crushed peppermint candies evenly over the surface. Gently press them down with your hand or the back of a spoon to help them adhere. Finish with a light dusting of the reserved peppermint powder.
Doneness Check for Peppermint Bark
Unlike baked goods, Peppermint Bark doesn’t have an internal temperature to check. Instead, you’re looking for visual and tactile cues:
First stage (after 20 minutes in refrigerator): The surface should look matte rather than glossy, and when you touch it gently, it should feel firm without leaving a mark. If it’s still too soft, give it another 10 minutes.
Complete setting (after 60 minutes total): The bark should be completely firm throughout. When you lift one corner of the parchment paper, the bark should lift cleanly without bending. The chocolate should have a slight snap when you press the edge. If it bends or feels rubbery, it needs more time to set completely.
Room temperature test: Before breaking into pieces, let the bark sit at room temperature for about 5 minutes. This prevents it from being too brittle and shattering into tiny pieces rather than nice shards.
Resting Your Peppermint Bark
Why resting matters: After the initial setting, your Peppermint Bark benefits from a rest period of at least 2 hours, or ideally overnight. During this time, the peppermint flavor mellows and distributes throughout the white chocolate, the two chocolate layers bond completely, and the texture reaches optimal firmness for clean breaking.
Proper resting technique: Once your bark is completely set in the refrigerator (about 1 hour), remove it from the baking sheet by lifting the parchment paper. Place the entire sheet of bark, still on the parchment, on a cutting board or counter at cool room temperature. Cover loosely with plastic wrap or another sheet of parchment paper to protect from dust and odors.
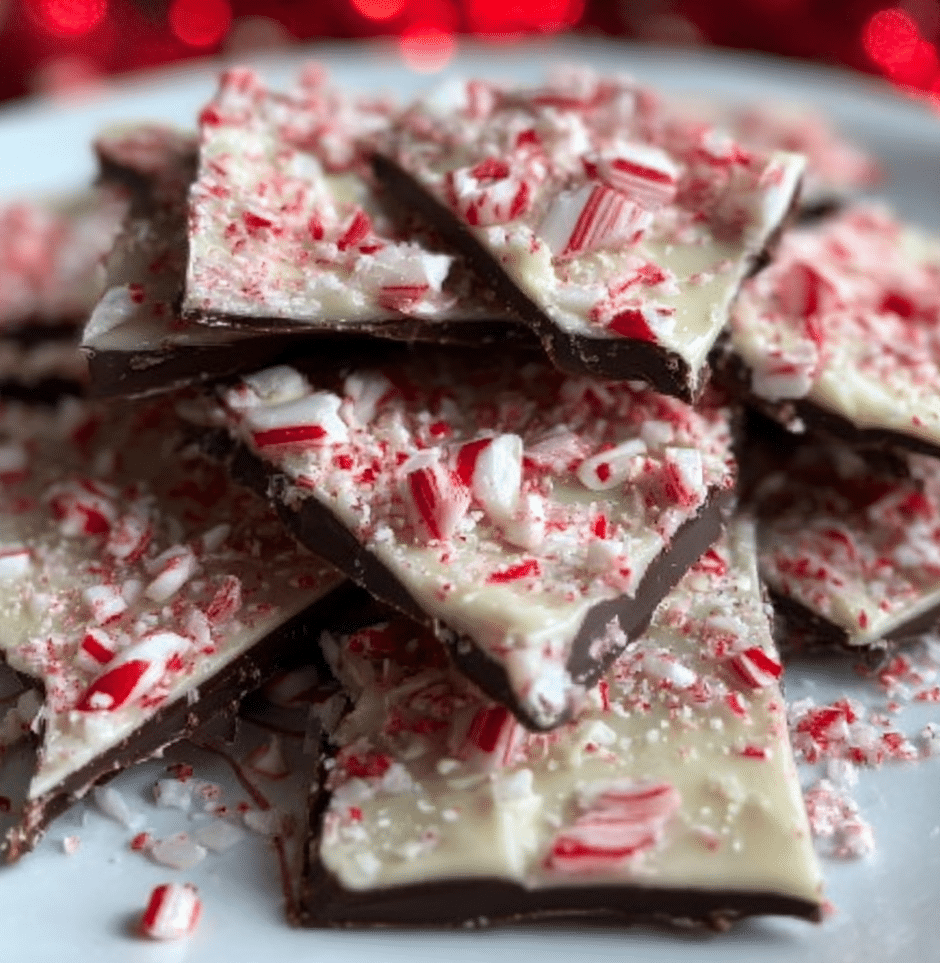
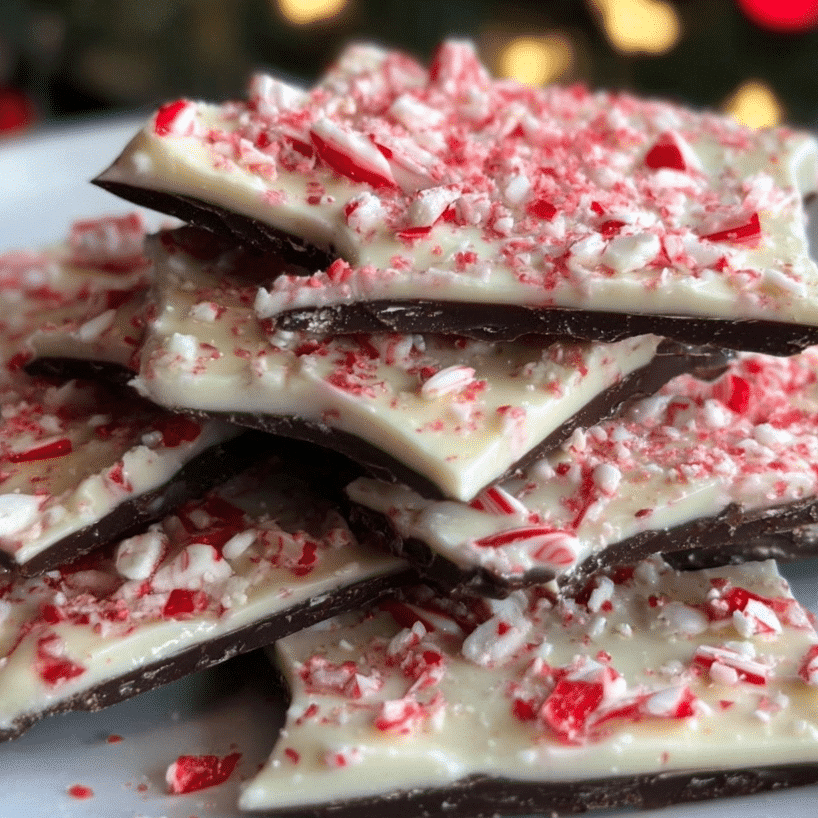
Breaking and portioning: After resting, remove the Peppermint Bark from the parchment paper. Use your hands to break it into rustic shards of various sizes—this irregular, organic look is part of the bark’s charm and makes it look artisanal. For gift-giving, aim for pieces about 2-3 inches across. For serving on a dessert platter, include a mix of large statement pieces and smaller bite-sized chunks.
Pro Tips for Perfect Peppermint Bark
These expert techniques come from years of making Peppermint Bark at Recipesrealm and troubleshooting common problems. Implement these tips for professional-quality results every time.
Avoiding Common Peppermint Bark Problems
Preventing separated layers: The most common issue with Peppermint Bark is the white and dark chocolate layers separating. This happens when the dark chocolate is either too cold or too warm when you add the white layer. The solution is timing—the dark chocolate should be firm but not icy cold. When you remove it from the refrigerator, wait 2-3 minutes before adding the white chocolate if your kitchen is very warm, or proceed immediately if your kitchen is cool.
Avoiding seized chocolate for Peppermint Bark: Chocolate seizes when it comes into contact with even tiny amounts of water, turning grainy and clumpy instead of smooth. Ensure all your bowls, spatulas, and tools are completely dry. Never cover chocolate while it’s melting (trapped steam causes moisture), and avoid wooden spoons which can harbor moisture. If chocolate does seize, you can sometimes rescue it by stirring in a small amount of vegetable shortening, about 1 teaspoon at a time.
Preventing dull, streaky chocolate: When chocolate cools too quickly or develops moisture on its surface, it can “bloom,” creating gray or white streaks that look unappetizing (though it’s still safe to eat). To prevent this, let melted chocolate cool slightly before spreading—it should be warm but not hot. Also, never refrigerate Peppermint Bark in an uncovered container where condensation can form.
Stopping peppermint candies from dissolving: If your crushed candy canes start to feel sticky or look like they’re dissolving into the white chocolate, it means there’s too much humidity in the air or the candies absorbed moisture before you added them. Always crush candies fresh, and on humid days, consider turning on a dehumidifier in your kitchen or using a fan to circulate air while working.
Essential Tool Recommendations for Peppermint Bark
Digital kitchen scale: While you can measure chocolate by volume, weighing it ensures consistent results every time. A scale also helps when you’re scaling the recipe up or down for different occasions. Look for one that measures in both ounces and grams.
Offset spatula: This angled spatula makes spreading chocolate smooth and even exponentially easier than a regular spatula or knife. The 6-8 inch size works perfectly for a standard baking sheet. It’s inexpensive and transforms your bark from amateur to professional-looking.
Microplane or fine grater: If you want to add chocolate shavings as a garnish or incorporate other flavors, a microplane is essential. You can also use it to create a finer peppermint powder from your crushed candies for a more uniform look.
Storage containers with dividers: When gifting or storing Peppermint Bark, use containers with parchment paper dividers between layers. This prevents pieces from sticking together and makes presentation more polished.
Storage & Reheating Your Peppermint Bark
Optimal storage conditions: Store Peppermint Bark in an airtight container at cool room temperature (65-70°F) for up to 2 weeks. Layer pieces between sheets of parchment paper to prevent sticking. If your kitchen is warmer than 70°F, store it in the refrigerator instead, but bring it to room temperature before serving for the best texture and flavor.
Freezing for long-term storage: Peppermint Bark freezes beautifully for up to 3 months. Wrap large pieces individually in plastic wrap, then place them in a freezer-safe container or bag. Thaw in the refrigerator overnight, then bring to room temperature before serving. Never thaw at room temperature directly from the freezer, as this causes condensation.
Reheating guidance: You wouldn’t typically reheat Peppermint Bark, but if it’s become too cold and hard from refrigeration, let it sit at room temperature for 15-20 minutes. The chocolate will soften slightly and return to the perfect texture. Don’t be tempted to microwave it—this melts the chocolate and ruins the bark’s structure.
Gifting and transport: When transporting Peppermint Bark, especially in warm weather, place it in an insulated bag with ice packs if you’ll be traveling for more than 30 minutes. Keep it away from direct sunlight and car heaters. For mailed gifts, ship early in the week to avoid weekend delays, and include a cold pack during warmer months.

Flavor Variations for Peppermint Bark
While classic Peppermint Bark is timeless, experimenting with different flavors and ingredients keeps this treat exciting and allows you to customize it for different tastes and dietary needs.
Creative Twists on Traditional Peppermint Bark
Dark Chocolate Peppermint Bark Overload: For serious dark chocolate lovers, skip the white chocolate layer entirely and make a double-dark version. Use dark chocolate for both layers but vary the cacao percentages—60% for the bottom layer and 70-85% for the top. This creates depth of flavor while letting the peppermint shine against the chocolate richness.
Salted Peppermint Bark: Add a sophisticated touch by sprinkling flaky sea salt (like Maldon or fleur de sel) over the white chocolate along with the peppermint candies. The salt enhances both the chocolate and mint flavors while adding a gourmet element. Use sparingly—about ½ teaspoon for a standard batch.
Triple Layer Peppermint Bark: Create a stunning three-layer effect by adding a middle layer of milk chocolate between the dark and white layers. This requires patience (each layer must set before adding the next), but the visual impact is extraordinary. Use 8 ounces each of dark, milk, and white chocolate, adjusting the peppermint candies proportionally.
Espresso Peppermint Bark: Stir 1-2 teaspoons of instant espresso powder into the melted dark chocolate for a mocha-mint flavor combination. The coffee notes complement both the chocolate and peppermint beautifully, creating a more sophisticated treat perfect for adult gatherings.
Dietary Modifications for Peppermint Bark
Sugar-Free Peppermint Bark: Use sugar-free chocolate (sweetened with stevia or erythritol) and sugar-free peppermint candies. Brands like Lily’s make excellent sugar-free chocolate chips that melt well. The texture will be slightly different but still delicious, making this treat accessible for diabetics or those watching sugar intake.
Vegan Peppermint Bark: Replace all chocolate with dairy-free alternatives made from coconut, almond, or oat milk. Ensure your white chocolate alternative is also vegan—many are surprisingly made with dairy. Most candy canes are already vegan, but double-check the ingredients to be certain.
Nut-Free Peppermint Bark: This recipe is naturally nut-free, but be vigilant about chocolate brands. Many chocolate manufacturers process their products in facilities that also handle tree nuts, which can be problematic for severe allergies. Look for certified nut-free chocolate brands, or purchase from dedicated allergy-friendly companies.
Keto-Friendly Peppermint Bark: Use keto-approved dark chocolate (85% cacao or higher) and make your white chocolate layer from cocoa butter, heavy cream, and a keto sweetener like monk fruit. Replace candy canes with sugar-free peppermint extract for flavor and a few drops of red food coloring swirled into the white layer for visual appeal.
Global Flavor Inspirations for Peppermint Bark
Mexican Hot Chocolate Peppermint Bark: Add ½ teaspoon of cinnamon and a pinch of cayenne pepper to the melted dark chocolate. The warming spices create a Mexican hot chocolate effect that pairs surprisingly well with the cool peppermint. This variation is perfect for adventurous eaters who enjoy complex flavors.
Italian Peppermint Bark with Amaretti: Crush 4-5 Italian amaretti cookies and mix them with the peppermint candies before sprinkling on top. The almond flavor and crunchy texture add an elegant Italian twist to this American treat. Drizzle with a little amaretto liqueur (optional) before the white chocolate sets for extra sophistication.
British Peppermint Bark with Tea: Steep 2 Earl Grey tea bags in 2 tablespoons of hot cream for 5 minutes, then strain and stir the infused cream into the white chocolate. The bergamot from the tea adds a floral, citrusy note that elevates the peppermint. Very British, very refined!
French Peppermint Bark with Fleur de Sel: Keep the classic recipe but use premium French chocolate (like Valrhona) and finish with a generous sprinkle of fleur de sel and tiny edible gold leaf pieces. This transforms humble bark into an elegant dessert worthy of a Parisian patisserie.
Peppermint Bark Flavor Variation Table
| Variation Name | Key Addition | Flavor Profile | Best For |
|---|---|---|---|
| Classic Peppermint Bark | Traditional peppermint candies | Sweet, minty, refreshing | Everyone, traditional celebrations |
| Dark Chocolate Overload | Double dark chocolate layers | Intense, sophisticated, less sweet | Dark chocolate enthusiasts |
| Salted Caramel Peppermint | Caramel pieces + sea salt | Sweet-salty-minty | Gourmet gifting |
| Espresso Mint | Instant espresso powder | Mocha-mint, energizing | Coffee lovers |
| Orange Peppermint | Orange zest + extract | Citrus-mint, bright | Adventurous palates |
| Cookies and Cream | Crushed Oreos (without filling) | Creamy with crunch | Kids and families |
| Coconut Peppermint | Toasted coconut flakes | Tropical-mint fusion | Beach-themed holidays |
| Pretzel Peppermint | Crushed pretzels | Sweet-salty-crunchy | Texture lovers |
Serving Suggestions for Peppermint Bark
Presentation elevates homemade Peppermint Bark from simple candy to an impressive holiday centerpiece. Here’s how to serve it for maximum impact.
Plating and Presentation Ideas for Peppermint Bark
Holiday dessert boards: Create a stunning winter dessert board by arranging Peppermint Bark pieces alongside other treats like chocolate-covered pretzels, sugar cookies, and fresh berries. Use a white or wooden board as your base, and add fresh pine sprigs, cinnamon sticks, and decorative elements for a festive look. The bark’s red and white colors naturally complement holiday themes.
Individual gift packaging: Package Peppermint Bark in clear cellophane bags tied with red and white striped ribbons for charming gifts. Stack 4-5 pieces per bag, alternating sizes for visual interest. Add a small gift tag with serving suggestions or a personal message. This presentation works beautifully for teacher gifts, party favors, or thank-you treats.
Dessert cups and parfaits: Layer crushed Peppermint Bark with whipped cream and crushed cookies in clear glasses for an easy, elegant dessert. The layers show off the beautiful colors, and the combination of textures—crunchy bark, soft cream, and cookie crumbs—creates a delightful eating experience.
Coffee and hot chocolate toppers: Serve small pieces of Peppermint Bark alongside hot beverages as edible stirrers or garnishes. The chocolate melts slightly as you stir, flavoring the drink with peppermint and creating a built-in treat. This works especially well for holiday brunch or after-dinner coffee.
Pairing Recommendations for Peppermint Bark
Ice cream combinations: Crumble Peppermint Bark over vanilla, chocolate, or coffee ice cream for a restaurant-quality dessert at home. The cold ice cream keeps the bark firm and crunchy, while the flavors complement each other perfectly. For a special touch, make ice cream sandwiches using peppermint ice cream between two large pieces of bark.

Cheese pairings: Surprisingly, Peppermint Bark pairs beautifully with creamy, mild cheeses like brie or mascarpone. The sweet-mint chocolate balances the rich, slightly tangy cheese. Serve this combination on a holiday appetizer board for a sophisticated twist that always sparks conversation.
Beverage pairings for Peppermint Bark: Pair traditional Peppermint Bark with rich hot chocolate topped with whipped cream for an ultra-decadent treat. For non-traditional options, try it with chilled peppermint tea, eggnog, or even champagne—the bubbles and crisp acidity cut through the sweet chocolate beautifully. For the adventurous, craft cocktails featuring chocolate liqueur or crème de menthe complement the bark’s flavors perfectly.
Fruit accompaniments: Serve Peppermint Bark alongside fresh strawberries, raspberries, or sliced oranges. The fruit’s natural acidity and juiciness provide a refreshing contrast to the rich chocolate. This combination works especially well for holiday brunches or afternoon tea services where you want to balance sweet treats with lighter options.
FAQs About Peppermint Bark
Over the years at Recipesrealm, I’ve received countless questions about making perfect Peppermint Bark. Here are the most common concerns and their solutions.
Can I use chocolate chips instead of bar chocolate for Peppermint Bark? While you technically can use chocolate chips, I don’t recommend it for the best results. Chocolate chips contain stabilizers that help them hold their shape during baking, which also prevents them from melting as smoothly as bar chocolate. If you must use chips, choose high-quality ones and consider adding ½ teaspoon of coconut oil per cup of chips to improve the texture. The bark may not be quite as smooth or glossy, but it will still taste delicious.
Why did my Peppermint Bark turn white and streaky? This white, streaky appearance is called “bloom,” and it happens when chocolate experiences temperature fluctuations or develops surface condensation. While it looks unappealing, it’s completely safe to eat and doesn’t affect the flavor. To prevent bloom, ensure your chocolate cools gradually at consistent temperatures, never refrigerate in an uncovered container where moisture can condense on the surface, and store finished bark in airtight containers at stable temperatures. If bloom does occur, you can gently buff the surface with a clean cloth to improve the appearance slightly.
Can I make Peppermint Bark without peppermint extract? Yes, you can make Peppermint Bark using only crushed candy canes for mint flavor. The result will have a milder peppermint taste and rely entirely on the visual red-and-white candy pieces for that characteristic look. If you prefer subtle mint flavor, this approach works well. For stronger mint taste without extract, use more crushed candies—up to 1 cup instead of ¾ cup.
How do I fix Peppermint Bark if the layers separate? If your layers separate after setting, you can still salvage the situation. Break the bark into very small pieces and use them as toppings for ice cream, brownies, or cookies. Alternatively, melt everything together gently and re-spread into a single-layer bark with mixed colors—it won’t look traditional, but the flavor will still be fantastic. To prevent separation in future batches, ensure your bottom chocolate layer is firm but not cold when adding the top layer.
Is Peppermint Bark safe during pregnancy? Peppermint Bark made with this recipe is generally safe during pregnancy as it contains no raw eggs, unpasteurized dairy, or other high-risk ingredients. However, some pregnant women experience heartburn or digestive issues from peppermint, so moderation is key. The chocolate also contains caffeine, though in relatively small amounts. If you have specific dietary concerns during pregnancy, consult your healthcare provider before indulging. The recipe can easily be made with decaffeinated chocolate alternatives if caffeine is a concern.
Can I make Peppermint Bark in humid weather? Humid weather presents challenges for chocolate work because moisture can cause chocolate to seize or bloom. If you live in a humid climate, work in an air-conditioned room if possible, or use a dehumidifier in your kitchen. Crush your peppermint candies just before using them (don’t let them sit out where they can absorb moisture), and consider storing finished bark in the refrigerator rather than at room temperature. If humidity is extreme (above 70%), you might have better success making bark during cooler, drier months.
How do I keep candy canes from getting sticky on Peppermint Bark? Sticky candy canes usually indicate they’ve absorbed moisture from the air. To prevent this, unwrap and crush candies immediately before use, store crushed candies in an airtight container with a silica gel packet if you must prepare them in advance, work in a cool, dry environment, and press candies gently into the chocolate rather than letting them sit on the surface where moisture can accumulate. If candies do become sticky, you can sometimes remedy this by placing the finished bark in the refrigerator, which firms everything up quickly before moisture becomes a problem.
What’s the best way to break Peppermint Bark into pieces? The rustic, irregular look of hand-broken bark is part of its charm. Once your bark is completely set and has rested at room temperature for 5-10 minutes, simply use your hands to break it into shards. Start at one corner and apply firm, even pressure—the bark should snap cleanly. For more control over sizes, use a large knife to score lines in the chocolate after it’s been refrigerated for about 30 minutes (still slightly soft), then break along those lines once it’s fully set. Avoid using a knife to cut set bark, as this often leads to cracked, messy edges rather than clean breaks.
Conclusion
Creating homemade Peppermint Bark transforms your kitchen into a holiday wonderland filled with the irresistible aromas of chocolate and peppermint. This easy, impressive treat brings joy to everyone who receives it—from teachers and neighbors to your own family gathered around the dessert table. With just three simple ingredients and minimal time investment, you can create something that looks professionally crafted and tastes absolutely divine.
The beauty of this Peppermint Bark recipe lies in its versatility and forgiving nature. Whether you’re a complete beginner or an experienced candy maker, you’ll achieve beautiful results by following the straightforward steps outlined in this guide. The make-ahead convenience means you can prepare batches weeks in advance, freeing up your precious time during the busiest days of the season.
What I love most about this recipe at Recipesrealm is how it brings people together. Every year, my family gathers in the kitchen to make multiple batches—the kids crush the candy canes, my husband melts the chocolate, and I oversee the assembly. The laughter, the anticipation of that first taste, and the satisfaction of packaging beautiful gifts create memories far more valuable than the ingredients themselves.
Don’t let another holiday season pass without trying this delightful treat. Fire up your kitchen, gather your ingredients, and experience the magic of homemade Peppermint Bark tonight! Whether you’re making it for gifts, parties, or simply to enjoy with your morning coffee, this recipe promises to become a cherished tradition in your home.
Join the thousands of home cooks at Recipesrealm who have fallen in love with this recipe! Once you master the basic technique, explore the flavor variations to keep things exciting year after year. Try our Classic Gingerbread Cookies Christmas Recipe next for more holiday baking inspiration that’s guaranteed to impress.
If you loved this recipe, don’t forget to share it with your friends or save it to try later! I’d be thrilled to see your personal touch—share your photos on Pinterest
Print
Easy Peppermint Bark Holiday Treat
- Total Time: 80
- Yield: 24 pieces 1x
- Diet: Vegetarian
Description
This easy Peppermint Bark recipe creates a festive holiday treat with layers of rich dark and white chocolate topped with crushed candy canes. Perfect for gifts, parties, or holiday snacking, this no-bake dessert comes together in just 20 minutes of active time and looks absolutely stunning!
Ingredients
12 ounces high-quality dark chocolate (60-70% cacao), roughly chopped
12 ounces high-quality white chocolate, roughly chopped
¾ cup crushed peppermint candies or candy canes (about 10–12 standard candy canes)
½ teaspoon pure peppermint extract
1 teaspoon coconut oil or vegetable shortening (optional)
Pinch of flaky sea salt (optional)
Instructions
1. Line a 9×13-inch rimmed baking sheet with parchment paper, ensuring it lies flat without wrinkles.
2. Roughly chop the dark chocolate into small, uniform pieces for even melting.
3. Place dark chocolate in a microwave-safe bowl. Microwave on 50% power for 30 seconds, stir, and repeat until 75% melted. Stir until completely smooth.
4. Pour melted dark chocolate onto prepared baking sheet and spread into an even ¼-inch thick layer using an offset spatula.
5. Refrigerate the dark chocolate layer for 15-20 minutes until firm to the touch but not completely hard.
6. While dark chocolate chills, place crushed peppermint candies in a zip-top bag and crush with a rolling pin into a mixture of powder and small chunks.
7. Melt white chocolate using the same method as dark chocolate, stirring every 20 seconds to prevent burning.
8. Once white chocolate is smooth, stir in peppermint extract thoroughly.
9. Remove the baking sheet from refrigerator and immediately pour white chocolate over the dark chocolate layer, spreading evenly to cover completely.
10. Quickly sprinkle crushed peppermint candies over the white chocolate while still wet, pressing gently to help them adhere.
11. Refrigerate for 60 minutes until completely firm and set throughout.
12. Remove from refrigerator and let sit at room temperature for 5 minutes before breaking.
13. Lift parchment paper to remove bark from pan, then break into rustic shards of various sizes using your hands.
14. Store in an airtight container at cool room temperature for up to 2 weeks, or freeze for up to 3 months.
Notes
For best results, use high-quality bar chocolate rather than chocolate chips, which contain stabilizers that prevent smooth melting.
The dark chocolate layer should be firm but not icy cold when adding the white chocolate to ensure proper bonding between layers.
Crush peppermint candies just before using to prevent them from absorbing moisture and becoming sticky.
Work quickly when adding white chocolate and peppermint toppings, as the chocolate begins to set rapidly.
You can substitute milk chocolate for the dark chocolate if you prefer a sweeter bark.
For a sophisticated touch, sprinkle flaky sea salt over the peppermint candies before the chocolate sets.
Store bark with parchment paper between layers to prevent pieces from sticking together.
- Prep Time: 20
- Category: Dessert
- Method: No-Bake
- Cuisine: American
Nutrition
- Serving Size: 1 piece (about 2 ounces)
- Calories: 185
- Sugar: 18g
- Sodium: 25mg
- Fat: 11g
- Saturated Fat: 7g
- Unsaturated Fat: 3g
- Trans Fat: 0g
- Carbohydrates: 21g
- Fiber: 1g
- Protein: 2g
- Cholesterol: 5mg
Keywords: peppermint bark, christmas candy, holiday treats, chocolate bark, candy cane dessert, easy christmas recipe, homemade candy, white chocolate peppermint, no-bake dessert