
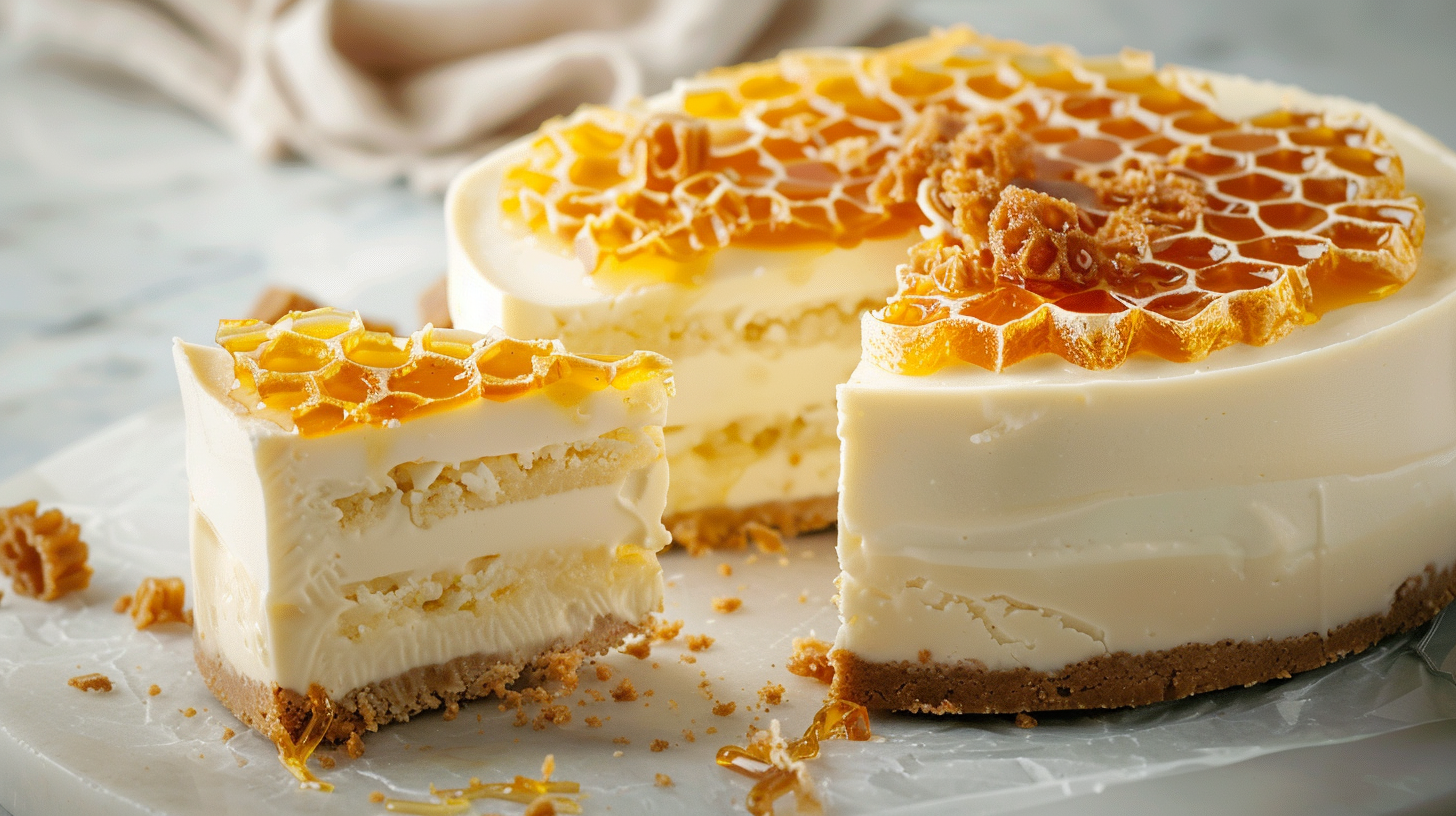
Honeycomb cheesecake – just saying those words takes me back to my grandmother’s kitchen, where the sweet aroma of caramelized sugar would dance through the air while she worked her magic at the stove. I’m Olivia from CookFoody.com, and today I’m sharing a dessert that combines the silky elegance of no-bake cheesecake with the playful crunch of homemade honeycomb candy. This isn’t just another dessert recipe; it’s a showstopper that transforms simple ingredients into pure edible gold.
After years of perfecting this recipe in my own kitchen, I’ve discovered the secret to achieving that perfect balance between the smooth, creamy filling and the dramatic honeycomb topping that literally bubbles with excitement. Whether you’re hosting a dinner party or simply want to treat your family to something extraordinary, this honeycomb cheesecake delivers restaurant-quality results with surprisingly simple techniques.
In this comprehensive guide, I’ll walk you through every step – from selecting the perfect cream cheese to mastering the art of honeycomb candy (yes, it’s easier than you think!). You’ll also discover my pro tips for achieving the smoothest filling, troubleshooting common issues, and creative variations that will make this recipe your own signature dessert.
Why This Honeycomb Cheesecake Recipe Works
This honeycomb cheesecake isn’t just another pretty dessert – it’s a masterpiece of texture and flavor that works on multiple levels:
• No-bake convenience meets gourmet results: Unlike traditional baked cheesecakes that require precise oven temperatures and water baths, this honeycomb cheesecake sets beautifully in the refrigerator, eliminating the risk of cracks or overcooking while delivering that coveted silky texture.
• The honey connection creates flavor harmony: The subtle honey in the cheesecake filling echoes the caramelized sweetness of the honeycomb topping, creating a cohesive flavor profile that feels intentional rather than overwhelming.
• Textural drama that wows every time: The contrast between the smooth, velvety cheesecake and the airy, crunchy honeycomb creates an exciting eating experience that keeps guests coming back for more.
• Make-ahead friendly for stress-free entertaining: Both components can be prepared in advance, making this the perfect dessert for dinner parties or special occasions when you want to spend time with guests rather than stuck in the kitchen.
• Customizable sweetness levels: The recipe allows you to adjust honey quantities to suit different taste preferences, from subtly sweet to gloriously indulgent.
Choosing the Right Ingredients for Honeycomb Cheesecake
The magic of this honeycomb cheesecake lies not just in technique, but in selecting quality ingredients that will elevate every bite.
Best Cream Cheese for This Recipe
Full-fat cream cheese is non-negotiable for this honeycomb cheesecake. The fat content creates that luxurious mouthfeel we’re after, while lower-fat alternatives will result in a grainy, less stable filling. Look for cream cheese that’s been properly softened at room temperature – it should yield easily to gentle pressure but not be warm or oily. Philadelphia and other premium brands work exceptionally well, but avoid whipped varieties as they contain air that can affect the final texture.
Buying Tips for Perfect Results
When shopping for your honeycomb cheesecake ingredients, freshness matters. Check expiration dates on dairy products, ensuring you have at least a week before they expire. For the honeycomb component, choose golden syrup over corn syrup when possible – it adds a more complex, buttery flavor that complements the honey beautifully. Your baking soda should be fresh (less than 6 months old) to ensure maximum bubbling action in the honeycomb.
Smart Substitutions
While this honeycomb cheesecake recipe is perfected as written, you can make thoughtful swaps: Replace digestive biscuits with graham crackers or even gingersnaps for flavor variation. If gelatin sheets aren’t available, powdered gelatin works perfectly – just bloom it properly in cold water first. For those avoiding refined sugar in the honeycomb, coconut sugar can substitute, though the color will be deeper and the flavor more caramelized.
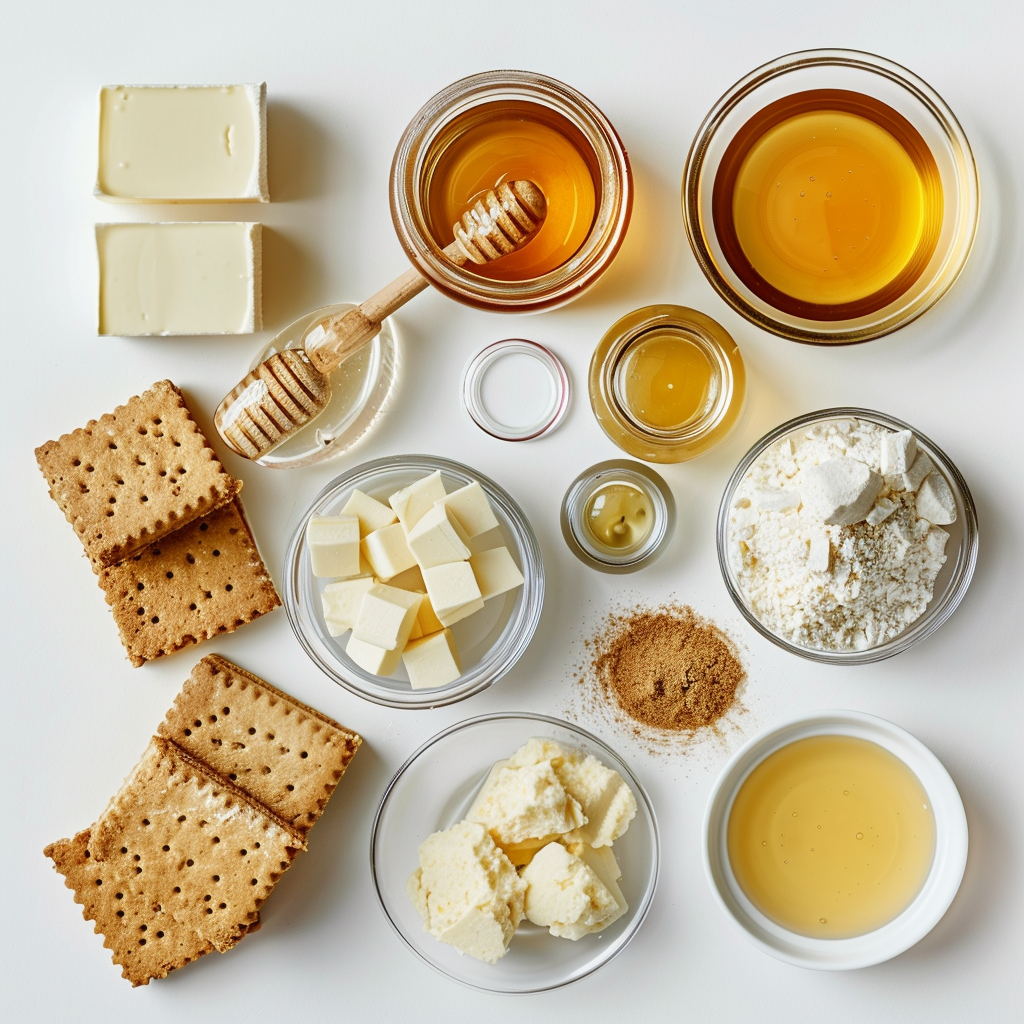
Ingredients & Prep for Honeycomb Cheesecake
Creating the perfect honeycomb cheesecake requires attention to detail in both ingredient preparation and timing.
Cream Cheese Prep Essentials
The foundation of any great honeycomb cheesecake starts with properly prepared cream cheese. Remove it from the refrigerator 2-3 hours before you plan to start, allowing it to reach room temperature naturally. Never microwave cold cream cheese to speed the process – this creates hot spots that lead to lumpy filling. When properly softened, your cream cheese should be completely smooth when beaten, with no visible chunks or streaks.
Gelatin Mastery
Gelatin gives our honeycomb cheesecake its perfect set without being rubbery. If using gelatin sheets, submerge them in cold water for 5 minutes until they become pliable and translucent. Squeeze out excess water before dissolving in a small amount of warm (not hot) liquid. For powdered gelatin, sprinkle it over cold water and let it bloom for 5 minutes before dissolving. Never add gelatin directly to hot mixtures – it can create strings and lumps.
Honeycomb Timing Strategy
The honeycomb element of this cheesecake is dramatic but time-sensitive. Have all ingredients measured and your parchment-lined tray ready before you start heating the sugar. The transformation from amber syrup to foamy honeycomb happens in seconds, so preparation is key. Keep your baking soda sifted and your whisk within reach – there’s no time for hunting through drawers once that sugar starts bubbling.
Step-by-Step Cooking Instructions for Honeycomb Cheesecake
Let me guide you through each stage of creating this stunning honeycomb cheesecake with confidence and precision.
Pre-Cooking Prep for Honeycomb Cheesecake
Begin your honeycomb cheesecake journey by organizing your workspace like a professional pastry chef. Line your springform pan with parchment paper for easy removal, and have a separate tray lined and ready for your honeycomb. Measure all ingredients precisely – baking is science, and accuracy matters. Bring your cream cheese to room temperature while you prepare the crust, and bloom your gelatin so it’s ready when needed. This preparation phase sets you up for smooth sailing through the entire process.
Cooking Method for Honeycomb Cheesecake
Start with the crust by combining crushed biscuits with melted butter until the mixture resembles wet sand and holds together when pressed. Pack this firmly into your prepared pan – use the bottom of a measuring cup for even distribution. While the crust chills, create your silky cheesecake filling by beating the cream cheese until perfectly smooth, then gradually adding honey, vanilla, and powdered sugar. Whip cream separately to soft peaks before folding it gently into the cheese mixture along with your dissolved gelatin. Pour over the crust and refrigerate.
Doneness Check for Honeycomb Cheesecake
Your honeycomb cheesecake filling is properly set when it doesn’t jiggle in the center when gently shaken and holds its shape when you run a knife around the edge. This typically takes 4-6 hours, but overnight is even better for the cleanest slices. The honeycomb is ready when it has doubled in size, turned golden, and hardened completely – usually within 10-15 minutes of cooling.
Resting Your Honeycomb Cheesecake
Patience pays off with this honeycomb cheesecake. Allow the filling to set completely before attempting to unmold – rushing this step results in a soft, unstable dessert. The honeycomb should cool completely before breaking into shards, as warm honeycomb is sticky and difficult to handle. Only add the honeycomb topping just before serving to maintain its satisfying crunch.
Pro Tips for Perfect Honeycomb Cheesecake
After making countless honeycomb cheesecakes, I’ve learned the insider tricks that separate good from extraordinary.
Avoiding Common Honeycomb Cheesecake Mistakes
The biggest mistake I see with honeycomb cheesecake is overmixing the filling, which can break down the cream cheese and create a thin, unstable texture. Mix just until combined, and always scrape the bowl thoroughly to eliminate lumps. For the honeycomb, resist the urge to stir the sugar as it heats – this causes crystallization and grainy texture. Trust the process and let the heat do the work.
Essential Tool Recommendations for Honeycomb Cheesecake
Invest in a good springform pan – cheap ones leak and don’t release cleanly. A stand mixer makes the filling effortless, but a hand mixer works fine if you’re patient. For the honeycomb, use a heavy-bottomed saucepan to prevent hot spots, and have a large whisk ready for the baking soda addition. A candy thermometer isn’t essential but helps nervous beginners – you’re looking for hard crack stage (300-310°F).
Storage & Reheating Your Honeycomb Cheesecake
Store your finished honeycomb cheesecake covered in the refrigerator for up to 4 days. The honeycomb topping will gradually soften, so for best results, store the shards separately in an airtight container and add just before serving. Never freeze assembled honeycomb cheesecake – the texture changes dramatically. However, you can freeze the plain cheesecake (without honeycomb) for up to 2 months.
Flavor Variations for Honeycomb Cheesecake
This versatile honeycomb cheesecake base welcomes creative interpretations while maintaining its essential character.
Chocolate Twist on Honeycomb Cheesecake
Transform your honeycomb cheesecake into a chocolate lover’s dream by replacing 50g of the cream cheese with melted dark chocolate, cooled to room temperature. Use chocolate biscuits for the crust and drizzle melted chocolate over the honeycomb shards for an extra decadent touch. The bitter-sweet chocolate creates beautiful contrast with the sweet honeycomb.
Seasonal Spice Honeycomb Cheesecake
For autumn entertaining, add warm spices to your honeycomb cheesecake: a pinch of cinnamon and nutmeg in the filling, with crushed gingersnaps replacing digestive biscuits in the crust. The honeycomb can incorporate a touch of ground ginger for extra warmth. This variation pairs beautifully with apple cider or spiced wine.
Citrus-Infused Honeycomb Cheesecake
Brighten your honeycomb cheesecake with fresh citrus: add lemon or orange zest to the filling and a tablespoon of fresh juice. The acidity cuts through the richness while the zest adds aromatic complexity. Consider adding candied citrus peel to the honeycomb for textural interest.
| Variation | Key Addition | Flavor Profile | Best Season |
|---|---|---|---|
| Classic | Pure honey | Sweet, creamy, caramelized | Year-round |
| Chocolate | Dark chocolate | Rich, indulgent, complex | Winter |
| Spiced | Cinnamon, nutmeg | Warm, comforting, aromatic | Fall |
| Citrus | Lemon/orange zest | Bright, fresh, balanced | Spring/Summer |
| Coffee Honeycomb Cheesecake | Espresso powder | Bold, sophisticated, energizing | Anytime |
Serving Suggestions for Honeycomb Cheesecake
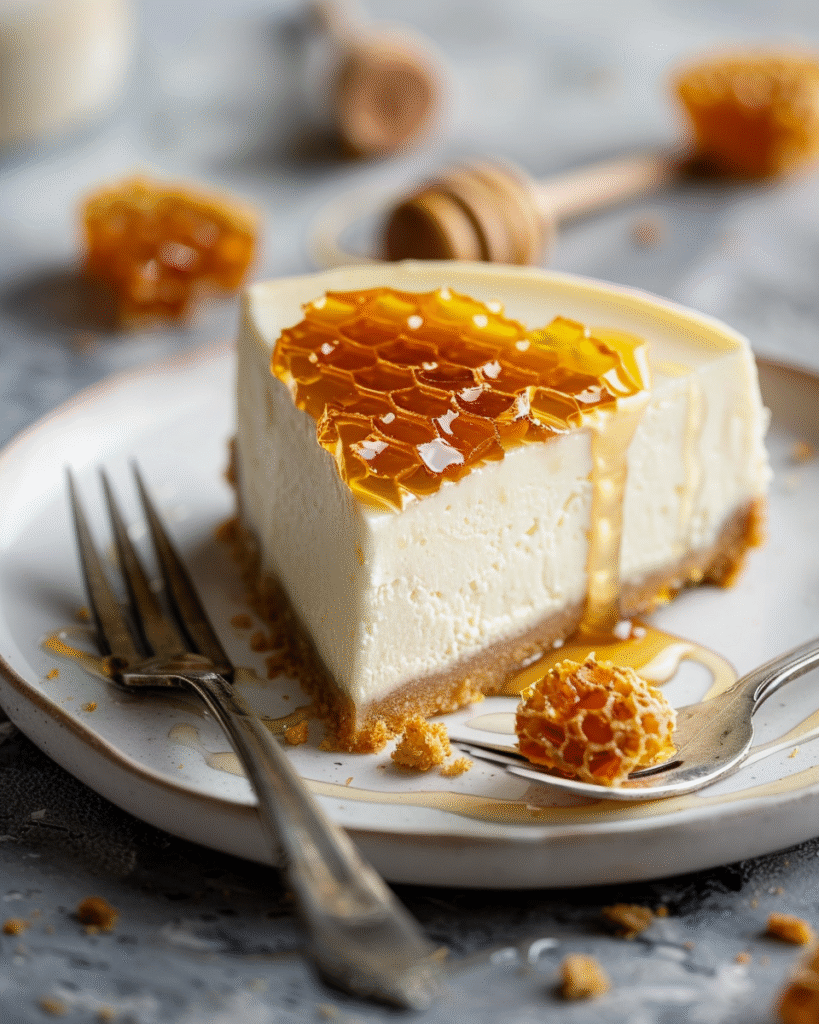
Presentation is everything when serving this spectacular honeycomb cheesecake, and the right accompaniments can elevate the experience from memorable to unforgettable.
• Fresh berry medley: The tartness of mixed berries provides perfect contrast to the sweet honeycomb cheesecake, while adding vibrant color and fresh flavor that cleanses the palate between rich bites.
• Drizzled honey: A light drizzle of high-quality honey around the plate echoes the honeycomb theme while adding glossy visual appeal and an extra layer of floral sweetness.
• Toasted nuts: Roughly chopped toasted almonds or hazelnuts scattered around the plate add textural contrast and nutty depth that complements both the cheesecake’s creaminess and the honeycomb’s crunch.
• Wine pairings: Serve this honeycomb cheesecake with a late-harvest Riesling or Moscato for sweetness balance, or surprise guests with a crisp Prosecco whose bubbles echo the honeycomb’s airy texture.
• Coffee service: Strong espresso or cappuccino cuts through the richness beautifully, making this honeycomb cheesecake perfect for ending dinner parties on a sophisticated note.
FAQs About Honeycomb Cheesecake
Over the years, I’ve answered countless questions about perfecting this honeycomb cheesecake. Here are the most common concerns and my tested solutions.
Can I make honeycomb cheesecake ahead of time? Absolutely! This honeycomb cheesecake is actually better when made a day ahead, allowing flavors to meld and the texture to set perfectly. Prepare the cheesecake base up to 3 days in advance, but make the honeycomb the same day for optimal crunch.
Why did my honeycomb cheesecake filling turn out lumpy? Lumpy filling typically results from cold cream cheese or overmixing. Ensure your cream cheese is truly room temperature and beat it alone first until completely smooth before adding other ingredients. If lumps persist, push the mixture through a fine-mesh sieve.
Is this honeycomb cheesecake safe during pregnancy? Yes! This no-bake honeycomb cheesecake uses pasteurized cream cheese and no raw eggs, making it pregnancy-safe. However, always consult your healthcare provider about specific dietary concerns during pregnancy.
My honeycomb didn’t bubble up – what went wrong? Old or inactive baking soda is usually the culprit. Baking soda loses potency over time, so replace it every 6 months. Also ensure your sugar syrup reaches proper temperature (hard crack stage) before adding the baking soda – insufficient heat won’t create the dramatic bubbling reaction.
Can I use low-fat cream cheese in this honeycomb cheesecake? I don’t recommend it. Low-fat cream cheese contains less fat and more water, resulting in a less stable, grainier texture that won’t hold up well in this no-bake honeycomb cheesecake. The full-fat version is essential for proper setting and luxurious mouthfeel.
Conclusion
This honeycomb cheesecake represents everything I love about baking – the magic of transformation, the joy of sharing something beautiful, and the satisfaction of mastering techniques that seem intimidating but are actually quite achievable. From the moment you first crack through that golden honeycomb to reveal the silky cheesecake beneath, you’ll understand why this dessert has become one of my most requested recipes.
The beauty of this honeycomb cheesecake lies not just in its dramatic presentation, but in how it brings people together. I’ve watched dinner guests’ faces light up when this dessert appears, seen children’s eyes widen at the honeycomb’s magical bubbling, and received countless messages from home bakers who’ve successfully created their own versions. That’s the power of a truly great recipe – it creates connections and memories that last far beyond the last bite.
Ready to create your own honeycomb cheesecake masterpiece? Start with room temperature cream cheese and fresh baking soda – these two simple steps will set you up for success! Join the thousands of home bakers who’ve fallen in love with this show-stopping dessert, and don’t forget to share your creations with me on social media.
Want to explore more spectacular desserts? Try my Grilled BBQ Chicken Drumsticks: The Ultimate Guide to Juicy, Flavorful Chicken for another torched masterpiece, or dive into my The Ultimate BBQ Baby Back Ribs Recipe: Fall-Off-The-Bone Perfection for more refrigerator-set wonders that deliver bakery-quality results at home!
If you loved this recipe, don’t forget to share it with your friends or save it to try later! I’d be thrilled to see your personal touch—share your photos on Pinterest.