
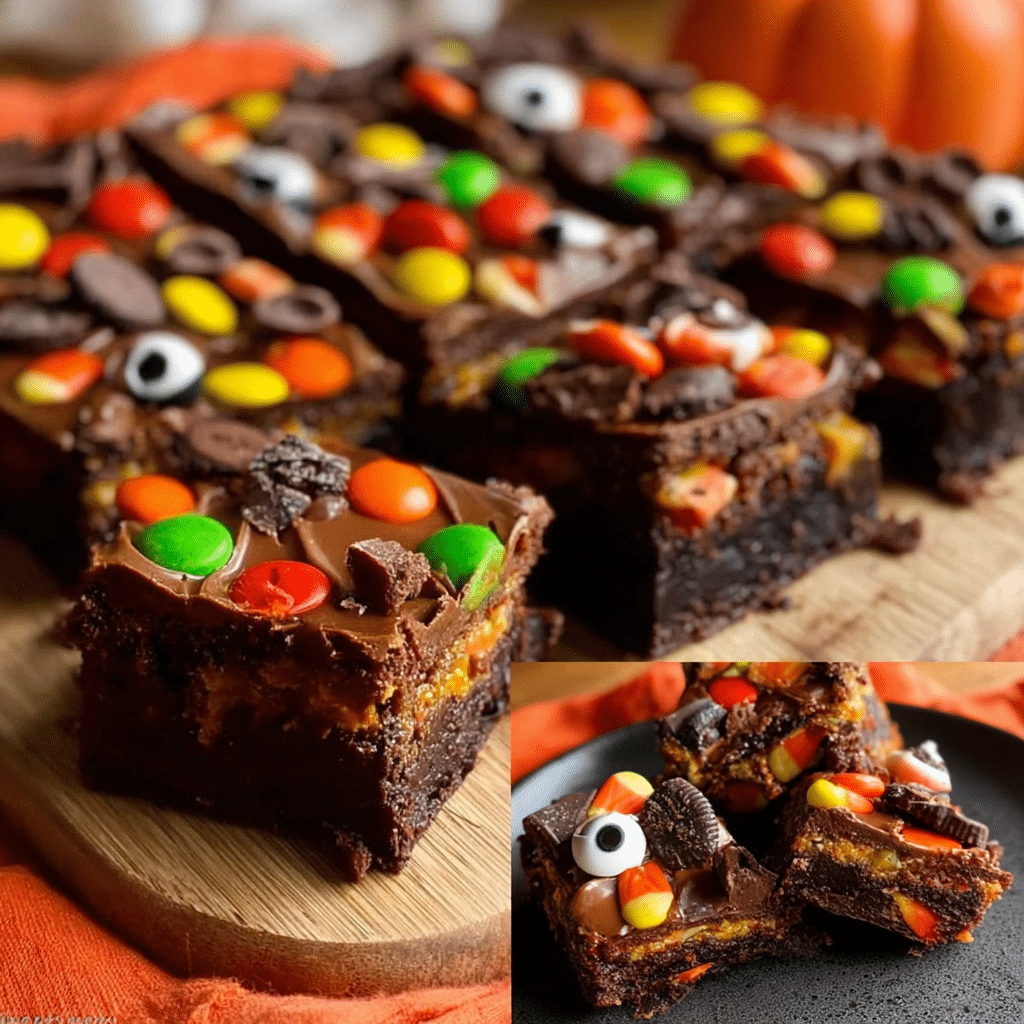
Candy Brownie Bars are the ultimate solution for that mountain of leftover Halloween candy sitting in your pantry! Hi there! I’m Lisa, the heart and soul behind Recipesrealm, and I’m about to share a game-changing dessert hack that’ll transform those mini chocolate bars, peanut butter cups, and candy-coated chocolates into the most decadent brownies you’ve ever tasted. Last Halloween, I found myself staring at bags of candy, wondering what to do with them all. That’s when inspiration struck—why not bake them into rich, fudgy brownies? The result was pure magic, and my family couldn’t get enough!
Are you tired of letting Halloween candy go stale or feeling guilty about the sugar overload? This recipe promises thick, gooey brownie bars loaded with your favorite candy pieces that create pockets of melted goodness in every bite. As someone who’s been perfecting dessert recipes for years at Recipesrealm, I’ve discovered that the key to incredible candy brownies lies in the timing of when you add the candy and how you layer the flavors. In this comprehensive guide, I’ll walk you through selecting the perfect candy combinations, mastering the brownie base, avoiding common baking pitfalls, and creative variations that’ll make these bars a year-round favorite. Get ready to turn those trick-or-treat treasures into a dessert everyone will be begging for!
Why This Candy Brownie Bars Recipe Works
At Recipesrealm, we believe that food isn’t just about taste—it’s about creating memories and sharing moments, and these Candy Brownie Bars deliver on every level. Here’s why this recipe has become a household favorite:
- Uses leftover Halloween candy you already have: No need to buy expensive mix-ins when you can repurpose those fun-size candy bars cluttering your kitchen. This recipe turns waste into wow!
- Ready in just 45 minutes from start to finish: Perfect for those spontaneous dessert cravings or last-minute bake sales. The simple brownie base comes together in under 15 minutes, and the baking does the rest.
- Infinitely customizable to suit any taste preference: Love peanut butter? Load it up with Reese’s. Prefer caramel? Throw in Milky Ways and Twix. Nut-free household? Stick with chocolate bars and Skittles. The versatility is unmatched!
- Creates a from-scratch taste with minimal effort: While using a quality brownie mix works beautifully, I’ll also share my signature scratch recipe that elevates these bars to bakery-level decadence.
- Perfect for weeknight treats or special celebrations: Whether you’re satisfying a Tuesday chocolate craving or bringing dessert to Thanksgiving dinner, these brownies fit every occasion seamlessly.
Choosing the Right Candy for Candy Brownie Bars
The secret to phenomenal Candy Brownie Bars lies in selecting candies that complement the rich chocolate base while adding textural contrast and flavor pops. Not all Halloween candy works equally well in baked goods, so let me guide you through the best choices.
Best Candy Types for This Recipe
Chocolate-Based Candies are your MVPs here. Snickers, Milky Way, and Three Musketeers create creamy pockets of caramel and nougat that stay gooey even after baking. Twix bars add a delightful cookie crunch, while Kit Kats provide crispy wafer layers that contrast beautifully with the fudgy brownie. Reese’s Peanut Butter Cups are absolutely legendary in this recipe—the peanut butter melts slightly and swirls into the chocolate for an irresistible combination.
Candy-Coated Chocolates like M&Ms and Milk Duds hold their shape better during baking, creating colorful bursts throughout your brownies. They also add a slight crunch factor that many people adore.
Caramel-Filled Options such as Rolos and Caramello bring a luxurious gooeyness that oozes when you bite into a warm brownie. Just be warned—these are dangerously addictive!
Candy Selection Tips
When raiding your Halloween stash, look for candies that are still fresh and haven’t been sitting around for months. Chocolate should have a glossy appearance without any white film (that’s bloom, which affects texture). Avoid candies with excessive artificial coloring that might bleed into your brownie batter and turn everything an unappetizing shade.
Here’s my pro tip: Chop larger candy bars into chunks rather than using them whole. This ensures even distribution throughout the brownies and creates more candy-per-bite ratio, which is what we’re all after! Aim for pieces roughly the size of a grape—small enough to disperse but large enough to create those coveted candy pockets.
Candy Substitutions and Combinations
Can’t find your favorite candy? No problem! Swap Butterfingers for Heath bars to maintain that toffee crunch. Replace Almond Joy with Mounds if you need a nut-free version. Even non-traditional options work beautifully—crushed Oreos, chopped brownies (yes, brownies in brownies!), or peanut butter chips can substitute for actual candy.
My favorite Candy Brownie Bars combination? Equal parts chopped Reese’s Cups, Snickers, and Kit Kats with a handful of M&Ms sprinkled on top. This trinity of textures and flavors creates the ultimate candy explosion in every square!

Ingredients & Prep for Candy Brownie Bars
Creating the perfect Candy Brownie Bars starts with quality ingredients and proper preparation. Whether you’re using a mix or going from scratch, these tips ensure bakery-worthy results every single time.
Brownie Base Essentials
For the From-Scratch Option:
- 1 cup (2 sticks) unsalted butter, melted
- 2 cups granulated sugar
- 4 large eggs, room temperature
- 1 tablespoon pure vanilla extract
- ¾ cup unsweetened cocoa powder (Dutch-process for deeper flavor)
- 1 cup all-purpose flour
- ½ teaspoon salt
- ½ teaspoon baking powder
For the Shortcut Version:
- 1 box (18-20 oz) quality brownie mix (Ghirardelli or Betty Crocker recommended)
- Eggs, oil, and water as specified on the package
- 1 extra egg for added fudginess
- 2 tablespoons melted butter to enrich the mix
Candy Mix-In Preparation
The Star Ingredients:
- 2-3 cups chopped Halloween candy (approximately 20-25 fun-size bars)
- Mix of textures: chocolate bars, peanut butter cups, caramel candies, and candy-coated chocolates
- Extra candy for topping (about ½ cup)
Before you start mixing, prep your candy properly. Unwrap all pieces and sort them by type. Place candy bars in the freezer for 10-15 minutes before chopping—this prevents them from getting sticky and mushy under your knife. Use a sharp chef’s knife on a cutting board, and wipe the blade between cuts to keep everything clean.
Essential Pantry Items for Success
Don’t underestimate the power of quality basics! Use real butter rather than margarine—it creates a richer flavor and better texture. Choose pure vanilla extract over imitation for authentic depth. If you’re making brownies from scratch, invest in good cocoa powder; Hershey’s Special Dark or Ghirardelli cocoa powder makes a noticeable difference.
A pinch of espresso powder (about 1 teaspoon) intensifies the chocolate flavor without making your brownies taste like coffee. A tablespoon of corn syrup added to the batter creates extra chewiness. And here’s a secret from my Recipesrealm kitchen: a tiny pinch of cinnamon (just ⅛ teaspoon) adds warmth and complexity that people can’t quite identify but absolutely love!
Step-by-Step Cooking Instructions for Candy Brownie Bars
Now comes the fun part—transforming those ingredients into the most spectacular Candy Brownie Bars you’ve ever created! Follow these detailed steps for foolproof success.
Pre-Cooking Prep for Candy Brownie Bars
Preparation is everything in baking! Start by preheating your oven to 350°F (175°C). Position your oven rack in the center for even heat distribution. Line a 9×13-inch baking pan with parchment paper, leaving about 2 inches of overhang on two opposite sides—this creates handles that make removing the brownies effortless once they’ve cooled.
Lightly grease the parchment with butter or cooking spray to prevent any sticking. If you’re using a glass baking dish instead of metal, reduce your oven temperature by 25°F since glass retains heat more intensely.
Gather all your ingredients and bring eggs to room temperature by placing them in a bowl of warm water for 5 minutes. Room temperature eggs incorporate more smoothly and create a better emulsion with the butter and sugar. Measure your flour correctly by spooning it into the measuring cup and leveling off with a knife—scooping directly from the bag packs in too much flour and leads to cakey, dry brownies.
Cooking Method for Candy Brownie Bars
For Scratch Brownies:
In a large mixing bowl, whisk together the melted butter and sugar vigorously for 2-3 minutes until well combined and slightly lighter in color. Add eggs one at a time, beating well after each addition. This creates the shiny, crackly top we all love. Stir in vanilla extract.
In a separate bowl, sift together cocoa powder, flour, salt, and baking powder. Gradually fold the dry ingredients into the wet mixture using a rubber spatula. Mix just until no flour streaks remain—overmixing develops gluten and creates tough brownies. The batter should be thick, glossy, and deeply chocolatey.
For Mix-Based Brownies:
Follow the package directions, but use the modifications I mentioned earlier (extra egg, melted butter addition). Beat the batter for an extra 30 seconds to incorporate air, which creates a lighter texture.
The Critical Candy Addition:
Here’s where technique matters! Reserve about ⅓ of your chopped candy. Fold the remaining ⅔ into your brownie batter gently—you want candy throughout but not overmixed to the point where chocolate melts completely into the batter.
Pour the batter into your prepared pan and spread evenly with an offset spatula. Now comes my signature technique: press the reserved candy pieces into the top of the batter, spacing them relatively evenly. These will create beautiful visible candy pieces on the surface and ensure every square has perfect topping coverage.
Doneness Check for Candy Brownie Bars
Timing is crucial for perfect fudgy brownies! Bake for 28-35 minutes, depending on your oven and desired texture. Start checking at 28 minutes using the toothpick test—insert a toothpick into the center (try to avoid candy pieces). You want it to come out with a few moist crumbs attached, NOT completely clean. Clean toothpick = overcooked brownies.
The internal temperature should read 190-195°F on an instant-read thermometer for the perfect fudgy consistency. The edges will look set and may pull slightly away from the pan, while the center still appears slightly jiggly. Don’t worry—that’s exactly what you want! The brownies will continue cooking from residual heat as they cool.
Resting Your Candy Brownie Bars
Patience pays off! This is the hardest part, but absolutely essential. Let the brownies cool in the pan on a wire rack for at least 30 minutes before attempting to cut them. For the cleanest cuts and best texture, refrigerate for 1-2 hours until completely chilled.
When ready to cut, use the parchment paper handles to lift the entire brownie slab out of the pan onto a cutting board. Use a large, sharp knife wiped clean between each cut for professional-looking squares. A hot knife (run under hot water and dried) slices through candy-studded brownies more easily.
Cut into 16 large squares or 24 smaller bars, depending on your preference. Store in an airtight container at room temperature for up to 5 days, or refrigerate for up to 2 weeks. They also freeze beautifully for up to 3 months!
Pro Tips for Perfect Candy Brownie Bars
After years of perfecting this recipe at Recipesrealm, I’ve discovered several game-changing techniques that separate good Candy Brownie Bars from absolutely extraordinary ones.
Avoiding Common Candy Brownie Bars Mistakes
The number one error? Overbaking! Every single time someone tells me their brownies came out dry and cakey, this is the culprit. Remember, your brownies continue cooking after leaving the oven. Pull them when they seem slightly underdone, and they’ll reach perfection as they cool.
Another common mistake is chopping candy too small. Tiny pieces melt completely into the batter and you lose that delightful candy texture. Aim for roughly ¾-inch chunks—substantial enough to create pockets of candy goodness.
Don’t skip the parchment paper lining! Trying to cut brownies directly in the pan creates messy edges and broken squares. The parchment overhang method I described earlier makes this process dramatically easier.
Watch your candy placement on top. If you add surface candy too early, heavier pieces may sink during baking. Press them in just before the pan goes into the oven, and they’ll set perfectly into place as the brownies bake.
Essential Tools for Candy Brownie Bars Success
Invest in a 9×13-inch metal baking pan rather than glass if you’re serious about brownies. Metal conducts heat more evenly and creates better texture. A light-colored pan prevents over-browning on the edges.
An instant-read thermometer eliminates all guesswork. At $15-20, it’s the best baking investment you’ll make. Get one with a digital display that reads quickly and accurately.
A bench scraper or large offset spatula makes spreading batter and lifting brownies infinitely easier. And a sharp chef’s knife is essential for clean cuts through candy pieces—dull knives smoosh and tear.
Storage & Reheating Candy Brownie Bars
Room temperature storage works perfectly for 4-5 days. Layer brownies between parchment paper in an airtight container to prevent sticking. Keep them away from heat and direct sunlight.
For longer storage, refrigerate for up to 2 weeks. The texture becomes even fudgier when chilled—many people prefer them cold! Let them sit at room temperature for 15 minutes before serving if you want that room-temp consistency back.
To freeze, wrap individual brownies in plastic wrap, then place in a freezer-safe container or bag. They’ll keep for 3 months. Thaw overnight in the refrigerator or at room temperature for 2-3 hours. For that fresh-baked experience, microwave a frozen brownie for 20-30 seconds—the candy will get melty and amazing!
Reheating tip: Microwave a single brownie for 10-15 seconds to recreate that warm, gooey texture. The candy pieces will soften and get slightly melty again. Add a scoop of vanilla ice cream on top for an instant dessert upgrade!
Flavor Variations for Candy Brownie Bars
One of the reasons Candy Brownie Bars have become such a Recipesrealm favorite is their incredible versatility. Here are creative twists that’ll keep this recipe exciting all year long!
Sweet & Salty Candy Brownie Bars
Transform your brownies into a sophisticated sweet-and-salty masterpiece! Sprinkle ½ teaspoon of flaky sea salt (like Maldon) over the batter before baking. Use salted caramel candies, pretzels, and Reese’s Pieces as your mix-ins. After baking, drizzle with caramel sauce and add a few more salt flakes. The salt cuts through the sweetness and elevates every flavor.
Mint Chocolate Candy Brownie Bars
Perfect for the holidays! Swap regular chocolate bars for York Peppermint Patties and Andes mints. Add ½ teaspoon of peppermint extract to your brownie batter. Top with crushed candy canes for a festive touch. These taste like a fancy restaurant dessert but take minimal extra effort.
Peanut Butter Explosion Candy Brownie Bars
For serious peanut butter lovers, use exclusively peanut butter candies: Reese’s Cups, Reese’s Pieces, Butterfinger, and Take 5 bars. Swirl ½ cup of creamy peanut butter into the brownie batter before baking for extra peanut butter ribbons throughout. Top with peanut butter chips. This variation is ridiculously indulgent!
Cookie Dough Candy Brownie Bars
Create a hybrid dessert by adding chunks of edible cookie dough! Press small scoops of store-bought or homemade edible cookie dough (heat-treated flour, no eggs) between candy pieces before baking. The cookie dough stays soft and creates an incredible texture contrast.

Global Flavor Profiles
Mexican Hot Chocolate Version: Add 1 teaspoon of cinnamon and ¼ teaspoon of cayenne pepper to the batter. Use chocolate candy bars mixed with cinnamon-dusted candies.
Italian-Inspired: Fold in chopped hazelnuts and use Ferrero Rocher or hazelnut chocolates. Add a splash of Frangelico hazelnut liqueur flavor extract to the batter.
British Candy Bar Edition: Use UK candy bars like Maltesers, Crunchie bars, and Aero chocolate for an international twist.
Dietary Adaptations for Candy Brownie Bars
| Dietary Need | Modification | Recommended Candy Choices |
|---|---|---|
| Gluten-Free | Use gluten-free flour blend (1:1 ratio) or gluten-free brownie mix | Milky Way, Dove chocolates, most M&Ms (check labels) |
| Nut-Free | Ensure all candies are nut-free certified | Hershey’s bars, Skittles, Starburst, Milk Duds, plain M&Ms |
| Dairy-Free | Use vegan butter and dairy-free chocolate; select dairy-free candies | Enjoy Life chocolate chips, certain dark chocolate bars, Smarties, Skittles |
| Lower Sugar | Use sugar-free brownie mix and sugar-free candy alternatives | Sugar-free chocolate bars (Russell Stover), sugar-free caramel candies |
| Keto/Low-Carb | Use almond flour brownie recipe with keto-friendly sweetener | ChocZero candy, Lily’s chocolate chips, low-carb peanut butter cups |
Serving Suggestions for Candy Brownie Bars
Candy Brownie Bars are incredibly versatile when it comes to presentation and pairing. Here’s how to serve them for maximum impact and enjoyment!
Classic Presentation
Serve these brownies at room temperature on a decorative platter, cut into neat squares. Dust with powdered sugar just before serving for an elegant touch—the white powder creates beautiful contrast against the dark chocolate and colorful candy pieces. Arrange them in a pyramid or single layer, and watch them disappear!
For a more casual gathering, stack them in a glass jar or display them in a lined basket with a “Help Yourself!” sign. The visual appeal of seeing all those candy chunks makes them irresistible.
Decadent Dessert Pairings
Transform a simple Candy Brownie Bar into a restaurant-quality dessert with these combinations:
The Sundae Special: Warm a brownie for 15 seconds, top with vanilla bean ice cream, drizzle with hot fudge and caramel sauce, add whipped cream and a cherry. It’s like a loaded brownie sundae!
Coffee Shop Style: Serve alongside a steaming latte or cappuccino. The coffee’s bitterness perfectly balances the brownie’s sweetness. Crumble a Candy Brownie Barsinto your coffee for an indulgent mocha treat!
Cheesecake Layer: Create a stunning two-layer dessert by pressing brownie batter into the bottom of a springform pan, baking until set, then topping with your favorite cheesecake mixture and baking until done. The Candy Brownie Bars create a sensational crust.
Beverage Pairings for Candy Brownie Bars
Cold milk is the classic choice—whole milk’s richness complements the fudgy texture beautifully. For adults, try these sophisticated pairings:
- Hot chocolate or hot cocoa: Doubles down on chocolate for the ultimate cocoa experience
- Cold brew coffee: The smooth, less acidic coffee profile pairs wonderfully with sweet Candy Brownie Bars
- Chai tea latte: The warm spices in chai create interesting flavor harmonies with chocolate
- Fresh berry smoothie: The fruit’s tartness cuts through rich chocolate and provides refreshing contrast
Creative Serving Ideas
Brownie Skewers: Cut brownies into cubes and thread onto wooden skewers alternating with fresh strawberries, marshmallows, and banana slices. Drizzle with chocolate sauce for a fun party presentation.
Brownie Trifle: Layer crumbled Candy Brownie Bars with chocolate pudding, whipped cream, and crushed cookies in clear glasses for individual trifles that showcase all the layers.
Ice Cream Sandwiches: Sandwich a scoop of ice cream between two thin brownies and roll the edges in mini chocolate chips or sprinkles. Freeze until firm for homemade ice cream sandwiches.
FAQs About Candy Brownie Bars
Over the years at Recipesrealm, I’ve received countless questions about making perfect Candy Brownie Bars. Here are the most common queries answered!
Can I use candy that’s been sitting around for a while?
Absolutely, as long as it’s not stale or discolored! Halloween candy typically stays fresh for 6-9 months if stored in a cool, dry place. The baking process actually refreshes slightly stale candy by melting it into the brownies. However, avoid candy that has visible bloom (white film), has been exposed to extreme temperatures, or smells off.
Why are my Candy Brownie Bars cakey instead of fudgy?
This usually happens from overbaking or using too much flour. Remember to measure flour by spooning it into the cup rather than scooping. Also, check your oven temperature with an oven thermometer—many ovens run hot. Pull Candy Brownie Barswhen they still look slightly underdone in the center; they’ll firm up as they cool.
Can I make Candy Brownie Bars without eggs?
Yes! For each egg, substitute with one of these options: ¼ cup unsweetened applesauce, ¼ cup mashed banana, 3 tablespoons aquafaba (chickpea liquid), or 1 “flax egg” (1 tablespoon ground flaxseed mixed with 3 tablespoons water, let sit 5 minutes). The texture will differ slightly but still be delicious.
How do I prevent candy from sinking to the bottom?
This is all about timing and technique! Coat your candy pieces lightly in flour before adding them to the batter—this helps suspend them. Also, don’t overmix once you add the candy. For top-layer candy, press pieces gently into the surface just before baking rather than mixing them in.
Can I double this recipe?
Absolutely! Double all ingredients and bake in two 9×13-inch pans or one large half-sheet pan (18×13 inches). For the half-sheet pan, you may need to increase baking time by 5-10 minutes. Always use the toothpick test to check doneness rather than relying solely on time.
What’s the best way to transport Candy Brownie Bars?
Cut brownies and layer them between sheets of parchment or wax paper in an airtight container. If transporting in warm weather, keep them in a cooler with ice packs to prevent melting. For potlucks, you can also keep them uncut in the baking pan, covered with foil, and cut them at your destination.
Are Candy Brownie Bars safe for pregnant women?
Yes! As long as the brownies are fully baked (internal temperature reaches at least 160°F), they’re perfectly safe. All the eggs are cooked through, eliminating any salmonella risk. However, pregnant women should avoid eating raw Candy Brownie Barsbatter due to uncooked eggs and flour.
Can I make these ahead for a party?
Candy Brownie Bars are perfect make-ahead desserts! Bake them up to 3 days in advance, let them cool completely, cover tightly, and store at room temperature. For even better flavor, make them 1 day ahead—the flavors meld and the texture becomes even more fudgy. Cut them the day of your event for the freshest appearance.
What if my candy melted completely into the brownies?
Don’t worry—they’ll still taste amazing! This usually happens when candy pieces are too small or the oven runs hot. Next time, use larger chunks and consider placing some candy pieces on top of the batter rather than mixing them all in. The melted candy creates a delicious marbled effect.
Conclusion
There you have it—everything you need to transform that leftover Halloween candy into the most spectacular Candy Brownie Bars you’ve ever tasted! From my kitchen at Recipesrealm to yours, I hope this recipe brings as much joy to your family as it has to mine. These brownies represent what I love most about cooking: taking simple ingredients, adding a dash of creativity, and creating something that brings people together around the table.
Whether you’re using up trick-or-treat leftovers, preparing for a bake sale, or just satisfying a serious chocolate craving, these brownies deliver every single time. The beauty lies in their flexibility—customize them with your favorite candy combinations, adjust the sweetness level, and make them your own signature dessert. Each time you bake them, you’re creating memories and sharing moments that matter.
Fire up your oven and try this tonight! Trust me, once your family tastes these fudgy, candy-loaded bars, they’ll become a regular request in your household. The combination of rich chocolate brownie with melty candy pockets creates a texture and flavor experience that store-bought treats simply can’t match.
Join the thousands of home cooks who’ve made Candy Brownie Bars their go-to dessert recipe! Share your creations, experiment with different candy combinations, and most importantly—enjoy every delicious bite. From cozy family dinners to vibrant gatherings, these brownies are crafted to make every moment feel like a special occasion.
Ready for more irresistible dessert inspiration? Try our Quick Family Dinner Idea – Haunted Mini Pizzas next! Let’s make every moment in the kitchen memorable together.
If you loved this recipe, don’t forget to share it with your friends or save it to try later! I’d be thrilled to see your personal touch—share your photos on Pinterest!
Print
Easy Dessert Hack for Halloween – Leftover Candy Brownie Bars
- Total Time: 45
- Yield: 16–24 bars 1x
Description
Transform leftover Halloween candy into the most decadent, fudgy brownie bars ever! These Candy Brownie Bars combine a rich chocolate base with chunks of your favorite candy bars for an irresistible treat that’s perfect for using up trick-or-treat leftovers or satisfying any chocolate craving.
Ingredients
1 cup (2 sticks) unsalted butter, melted
2 cups granulated sugar
4 large eggs, room temperature
1 tablespoon pure vanilla extract
3/4 cup unsweetened cocoa powder
1 cup all-purpose flour
1/2 teaspoon salt
1/2 teaspoon baking powder
2–3 cups chopped Halloween candy (Snickers, Reese’s, Kit Kats, Milky Way, M&Ms, etc.)
1/2 cup extra candy for topping
Instructions
1. Preheat your oven to 350°F (175°C). Line a 9×13-inch baking pan with parchment paper, leaving 2-inch overhang on two sides.
2. In a large bowl, whisk together melted butter and sugar for 2-3 minutes until combined. Add eggs one at a time, beating well after each. Stir in vanilla extract.
3. In a separate bowl, sift together cocoa powder, flour, salt, and baking powder.
4. Gradually fold dry ingredients into wet mixture just until combined. Don’t overmix.
5. Chop your Halloween candy into 3/4-inch chunks. Reserve about 1/3 of the candy pieces.
6. Gently fold the remaining 2/3 of candy into brownie batter.
7. Pour batter into prepared pan and spread evenly with a spatula.
8. Press reserved candy pieces into the top of the batter, distributing evenly.
9. Bake for 28-35 minutes, or until a toothpick inserted comes out with moist crumbs (not clean).
10. Let brownies cool in the pan for 30 minutes, then refrigerate for 1-2 hours for cleanest cuts.
11. Use parchment handles to lift brownies out of pan. Cut into 16-24 squares with a sharp knife, wiping blade between cuts.
Notes
For extra fudgy brownies, pull them from the oven when they look slightly underdone – they’ll continue cooking as they cool.
Freeze candy bars for 10-15 minutes before chopping to prevent sticking.
Store in an airtight container at room temperature for 5 days, refrigerate for 2 weeks, or freeze for 3 months.
For best results, let brownies cool completely before cutting for clean edges.
Warm individual brownies in the microwave for 10-15 seconds to recreate that fresh-baked gooey texture.
- Prep Time: 15
- Cook Time: 30
- Category: Dessert
- Method: Baking
- Cuisine: American
Nutrition
- Serving Size: 1 brownie bar
- Calories: 285
- Sugar: 32g
- Sodium: 95mg
- Fat: 14g
- Saturated Fat: 8g
- Unsaturated Fat: 5g
- Trans Fat: 0g
- Carbohydrates: 38g
- Fiber: 2g
- Protein: 4g
- Cholesterol: 65mg
Keywords: candy brownie bars, halloween candy brownies, leftover candy recipe, chocolate brownies, candy bar brownies