

Haunted Mini Pizzas are the ultimate solution for busy weeknights when you need something fun, fast, and family-friendly on the table. Are you tired of the same boring dinner routine that leaves your kids unexcited and you exhausted? These spooky-themed mini pizzas transform ordinary weeknight cooking into an interactive culinary adventure that brings smiles to everyone’s faces.
Hi there! I’m Lisa, the heart and soul behind Recipesrealm, and I discovered this recipe during a particularly chaotic October evening when my kids were begging for something “Halloween-y” but I only had 30 minutes before soccer practice. What started as a desperate dinner solution has become our family’s most-requested meal year-round! These mini pizzas prove that fun food doesn’t have to be complicated or time-consuming.
This recipe delivers crispy, cheesy, customizable mini pizzas that your family can decorate with spooky faces and creative toppings. You’ll discover why this recipe works for any skill level, learn how to choose the perfect base and toppings, master quick assembly techniques, and find answers to common questions about making these adorable pizzas. Whether you’re planning a Halloween party or just want to make Tuesday night more exciting, these Haunted Mini Pizzas are about to become your new secret weapon.
Why This Haunted Mini Pizzas Recipe Works (H2)
At Recipesrealm, we believe that food isn’t just about taste—it’s about creating memories and sharing moments, and these Haunted Mini Pizzas embody that philosophy perfectly. Here’s why this recipe has won over thousands of home cooks:
- Uses affordable, pantry-friendly ingredients – Everything you need is available at your local grocery store, from English muffins to mozzarella cheese, making this recipe budget-conscious without sacrificing flavor or fun.
- Ready in just 20 minutes from start to finish – Between prep, assembly, and baking, you’ll have dinner on the table faster than ordering takeout, perfect for those hectic weeknight schedules when time is precious.
- Completely customizable for picky eaters – Each family member can create their own mini pizza masterpiece with their favorite toppings, eliminating dinner battles and encouraging kids to try new ingredients in a fun, pressure-free way.
- Perfect for meal prep and batch cooking – Assemble dozens ahead of time, freeze them individually, and bake whenever you need a quick meal, making these mini pizzas ideal for busy families who plan ahead.
- Encourages creativity and family bonding – The hands-on decorating process turns dinner preparation into quality time together, where kids develop kitchen confidence and adults can unleash their inner artist.
Choosing the Right Base for Haunted Mini Pizzas (H2)
The foundation of exceptional Haunted Mini Pizzas starts with selecting the perfect base that holds toppings beautifully while delivering satisfying texture and flavor.
Best Bases for This Recipe
English Muffins are my top recommendation for Haunted Mini Pizzas because their nooks and crannies create the ideal texture—crispy edges with a slightly chewy center that holds sauce and cheese without becoming soggy. The pre-split design means zero prep work, and their uniform size ensures even cooking every time.
Mini Bagels offer a denser, chewier base that works wonderfully if your family prefers a more substantial bite. Their thicker profile stands up to heavier toppings and extra cheese, making them perfect for hearty appetites.
Tortillas or Flatbreads create ultra-crispy, cracker-like pizzas that bake in just 8-10 minutes. Choose this option when you want a lighter meal or need to accommodate gluten-free diets with specialized tortillas.
Biscuit Dough (homemade or refrigerated) delivers a fluffy, bread-like base with buttery richness. This option requires slightly more effort but rewards you with bakery-quality results that impress guests at Halloween parties.
Buying Tips
Look for fresh, soft bread products without any signs of staleness or hard edges—fresh bases ensure the best texture after baking. Check expiration dates carefully, especially during busy holiday seasons when products move quickly through stores.
Choose whole wheat or multigrain options to sneak extra nutrition into your Haunted Mini Pizzas without compromising taste. Kids often don’t notice the difference when bases are covered with delicious toppings and melted cheese.
Ask your bakery department for day-old English muffins or bagels at a discount if you’re making large batches for parties. These work perfectly since you’re toasting them anyway, and the savings add up quickly.
Substitutions
Swap English muffins for naan bread when you want a softer, more pillowy base with subtle flavor that complements bold toppings. Cut larger naan into smaller circles for perfect portion sizes.
Replace traditional bases with cauliflower crust for low-carb or keto-friendly Haunted Mini Pizzas that deliver vegetables disguised as pizza magic. This substitution works especially well for health-conscious families.
Use sliced polenta rounds for a gluten-free option that creates uniquely textured pizzas with a slight corn sweetness that pairs beautifully with savory toppings.
Ingredients & Prep for Haunted Mini Pizzas (H2)
Base Prep Essentials
Toasting the base is crucial for preventing soggy Haunted Mini Pizzas. Place your English muffins, bagels, or chosen base on a baking sheet and toast them in a 400°F oven for 3-4 minutes until just slightly golden. This creates a barrier that keeps sauce from soaking through while maintaining the perfect texture contrast between crispy exterior and tender interior.
Arranging strategically on baking sheets ensures even cooking and makes decorating easier. Line your sheets with parchment paper for effortless cleanup, and space bases about 1 inch apart to allow heat circulation. Use multiple sheets if needed rather than overcrowding, which causes uneven melting.
Pre-splitting thick bases like bagels completely through ensures they bake evenly and creates more surface area for your spooky designs. Use a serrated knife for clean cuts that don’t compress the bread.
Toppings and Decorating Ingredients
Pizza Sauce Base:
- 1 cup pizza sauce or marinara (store-bought or homemade)
- 2 tablespoons tomato paste (for thicker consistency)
- 1 teaspoon Italian seasoning
- ½ teaspoon garlic powder
- Pinch of sugar (balances acidity)
Cheese Selection:
- 2 cups shredded mozzarella cheese (melts beautifully)
- ½ cup shredded cheddar (adds color and flavor depth)
- ¼ cup grated Parmesan (for extra savory notes)
Spooky Decorating Elements:
- Black olives (sliced for eyes, spiders, and bats)
- Bell peppers (red, yellow, orange for pumpkin faces)
- Cherry tomatoes (halved for eyes or accents)
- Mushroom slices (for ghostly shapes)
- String cheese (pulled apart for mummy wrappings)
- Pepperoni slices (for jack-o’-lantern faces)
- Fresh basil or spinach leaves (for monster hair)
Optional Enhancement Ingredients:
- Red pepper flakes (for adults who like heat)
- Fresh oregano (aromatic finishing touch)
- Olive oil (brush on edges for golden crust)
- Minced garlic (mix into sauce for bold flavor)
Pantry Staples
Quality olive oil enhances crust flavor when brushed on edges before baking, creating restaurant-quality golden borders that add visual appeal and delicious taste.
Italian herb blend elevates store-bought sauce instantly—mix in dried basil, oregano, and thyme for that homemade taste without extra effort.
Balsamic vinegar (just a few drops in your sauce) adds complexity and depth that makes people wonder about your secret ingredient.
Step-by-Step Cooking Instructions for Haunted Mini Pizzas (H2)
Pre-Cooking Prep for Haunted Mini Pizzas
Step 1: Preheat your oven to 425°F and position racks in the upper and lower thirds for optimal heat distribution. Line two large baking sheets with parchment paper or silicone baking mats to prevent sticking and ensure easy cleanup.
Step 2: Arrange your English muffin halves (or chosen base) cut-side up on the prepared baking sheets, spacing them about 1 inch apart. Toast them bare in the preheated oven for 3-4 minutes until just beginning to firm up but not fully browned—this crucial step prevents soggy pizzas.
Step 3: While bases toast, prepare your decorating station. Slice all vegetables, separate cheese strings, and organize toppings in small bowls for easy access. This assembly-line approach makes decorating fun and efficient, especially with kids helping.
Step 4: Remove toasted bases from oven and let them cool for 2 minutes before adding toppings. This prevents sauce from immediately soaking in and gives you a stable surface to work with.
Cooking Method for Haunted Mini Pizzas
Step 1 – Sauce Application: Spread 1-2 tablespoons of pizza sauce on each toasted base, leaving a small border around edges for that classic pizza look. Use the back of a spoon for even distribution without tearing the bread. Don’t oversauce—too much moisture leads to soggy centers.
Step 2 – Base Cheese Layer: Sprinkle a generous layer of shredded mozzarella cheese over the sauce, covering it completely. This cheese layer acts as “glue” for your decorative toppings and creates that satisfying cheese pull everyone loves. Use approximately 2-3 tablespoons per mini pizza.
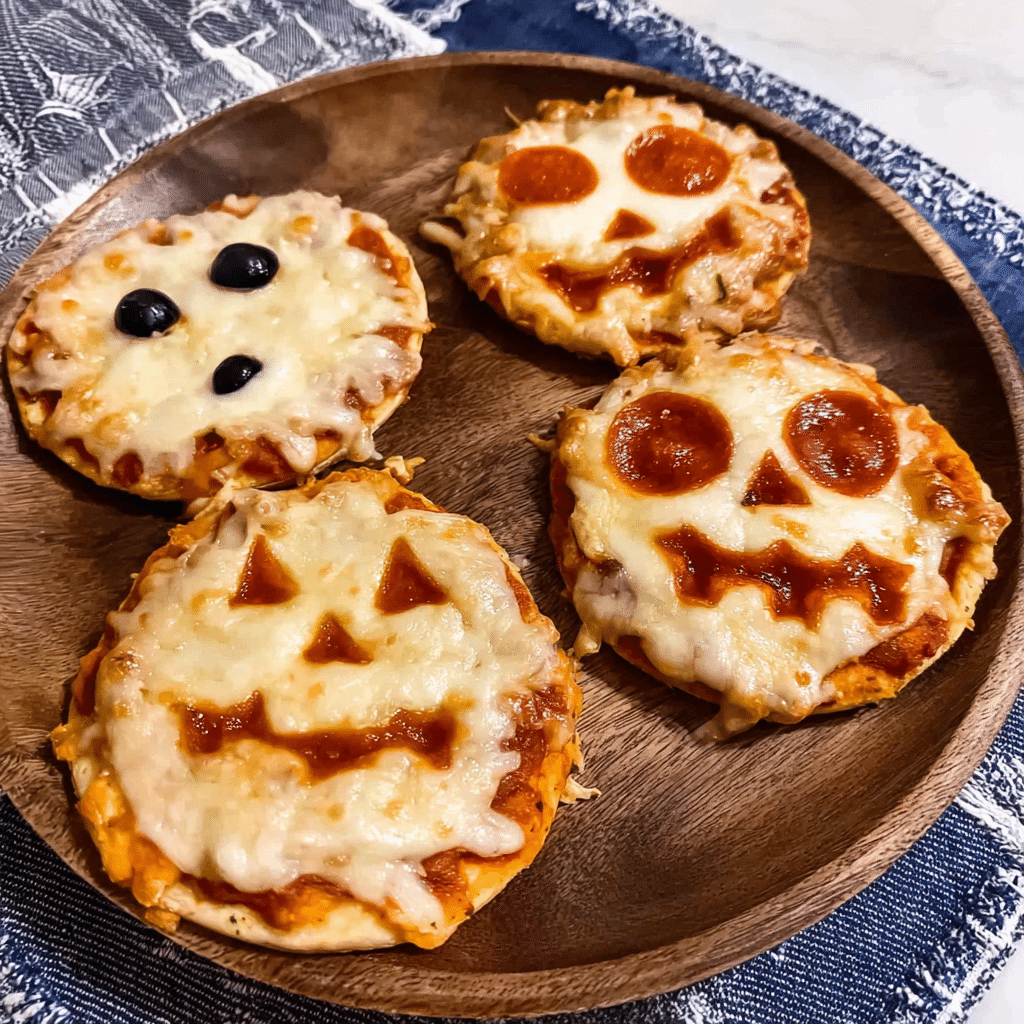
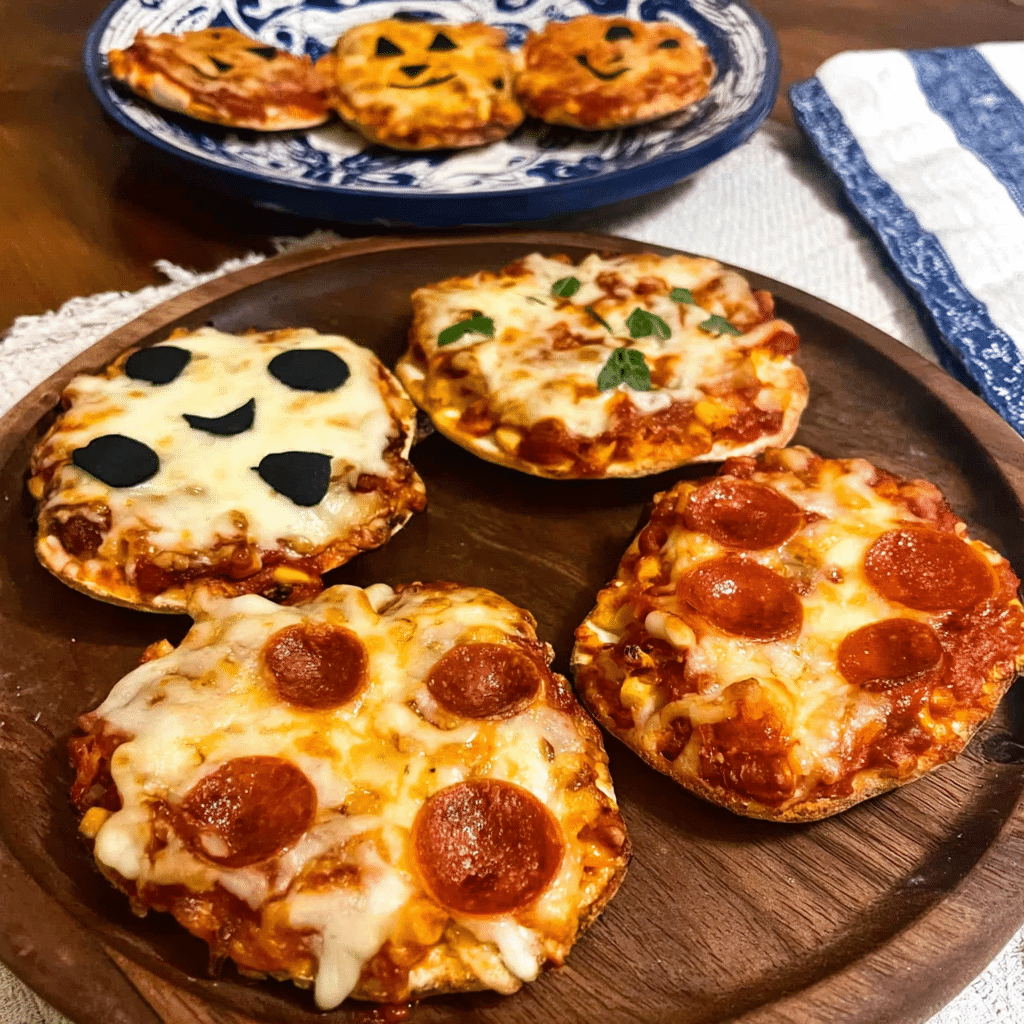
Step 3 – Spooky Decorating: Now for the fun part! Create haunted faces and designs using your prepared toppings:
- Ghost faces: Use mozzarella cheese as the ghost body with black olive slices for eyes and mouth
- Jack-o’-lanterns: Arrange bell pepper strips to create triangle eyes and nose, with a curved pepper smile
- Mummies: Layer string cheese strips across the pizza, leaving gaps for olive slice eyes
- Spiders: Place a large olive slice for the body with thin olive slivers as legs
- Monster faces: Get creative with various toppings to create silly or scary expressions
Step 4 – Final Cheese Top: Add a light sprinkle of cheddar and Parmesan over decorations to help secure toppings and add extra flavor dimension.
Step 5 – Baking: Place baking sheets in the preheated 425°F oven. Bake for 10-12 minutes, rotating sheets halfway through for even browning, until cheese is fully melted, bubbly, and beginning to turn golden in spots.
Doneness Check for Haunted Mini Pizzas
Visual cues indicate perfect doneness: The cheese should be completely melted with no raw-looking spots, exhibiting light golden-brown areas that indicate caramelization. Edges of the base should appear crispy and golden, and any vegetable toppings should be softened but not burnt.
Timing variations: Thinner bases like tortillas may only need 8-10 minutes, while thicker bagels might require 12-15 minutes. Watch closely during the final minutes to prevent burning, as ovens vary significantly in actual temperature.
Temperature check: If you’re uncertain, the center of your Haunted Mini Pizzas should reach 165°F, ensuring any toppings are fully heated through and safe to eat.
Resting for Haunted Mini Pizzas
Let pizzas rest for 2-3 minutes after removing from the oven before serving. This brief waiting period allows the cheese to set slightly, preventing topping slide-off when kids eagerly grab their creations. The resting time also brings temperatures down to safer eating levels while maintaining that fresh-from-the-oven appeal.
Transfer carefully using a wide spatula to move pizzas from baking sheet to serving plates, supporting the entire base to keep toppings intact. This attention to detail ensures your spooky designs arrive at the table looking as good as they did coming out of the oven.
Pro Tips for Perfect Haunted Mini Pizzas (H2)
Avoiding Soggy or Burnt Pizzas
Toast bases before topping as mentioned earlier—this single step makes the biggest difference between mediocre and magnificent mini pizzas. The toasted surface creates a moisture barrier that keeps saucy toppings from penetrating and softening the bread.
Use sauce sparingly because less is truly more with mini pizzas. Too much sauce not only creates sogginess but also causes toppings to slide off during eating. Aim for a thin, even layer that adds flavor without overwhelming the base.
Pat wet ingredients dry before using them as toppings. Blot olives, tomatoes, and other moisture-rich vegetables with paper towels to remove excess liquid that could make pizzas soggy during baking.
Don’t overbake because dried-out, hard mini pizzas disappoint everyone. Set a timer and check pizzas at the minimum recommended time, remembering they’ll continue cooking slightly from residual heat after removal from the oven.
Avoid overcrowding baking sheets as this traps steam and prevents proper crisping. Give each mini pizza space to breathe, using multiple sheets and baking in batches if necessary for best results.
Tool Recommendations for Haunted Mini Pizzas
Pizza cutter or kitchen shears make serving and eating easier, especially for younger children. Cut larger mini pizzas into halves or quarters for perfect kid-sized portions that are easier to handle.
Small cookie cutters transform vegetables into perfect shapes for decorating—stars, bats, moons, and other Halloween shapes add professional polish to your Haunted Mini Pizzas with minimal effort.
Offset spatula provides precise sauce spreading and helps transfer finished pizzas without disturbing carefully arranged toppings. This inexpensive tool elevates your pizza-making game significantly.
Silicone baking mats are reusable, eco-friendly alternatives to parchment paper that nothing sticks to. They’re worth the investment if you make these pizzas regularly, paying for themselves quickly while reducing waste.
Kitchen thermometer takes the guesswork out of doneness, especially important when serving to children or anyone with food sensitivities. Knowing your pizzas reach safe temperatures provides peace of mind.
Storage & Reheating
Refrigerate leftovers in an airtight container for up to 3 days, though these Haunted Mini Pizzas rarely last that long in my house! Separate layers with parchment paper to prevent sticking and maintain decorations.
Freeze unbaked pizzas for ultimate meal prep convenience. Assemble completely, freeze on baking sheets until solid, then transfer to freezer bags for up to 3 months. Bake directly from frozen, adding 3-5 minutes to cooking time.
Reheat properly to restore crispy texture rather than microwaving, which creates sad, soggy pizzas. Use a 375°F oven for 5-7 minutes or a toaster oven until heated through and cheese re-melts.
Air fryer reheating works beautifully for small batches—375°F for 3-4 minutes produces results that taste freshly baked with minimal effort and energy use.
Flavor Variations for Haunted Mini Pizzas (H2)
Spicy Twist
Add cayenne pepper to your sauce (start with ⅛ teaspoon per cup and adjust to taste) for subtle background heat that adults appreciate without overwhelming kids’ palates.
Use pepper jack cheese instead of plain mozzarella for built-in spiciness that melts beautifully while adding visual interest with pepper flecks throughout.
Top with jalapeño slices arranged as spooky eyes or decorative elements for those who love serious heat. Remove seeds for milder spice or leave them in for authentic jalapeño fire.
Drizzle with hot honey after baking for that trendy sweet-heat combination that’s taking the food world by storm. The contrast between spicy and sweet creates addictive flavor complexity.
Dietary Modifications
Keto/Low-Carb: Use fathead dough mini pizza crusts (made from mozzarella and almond flour) or portobello mushroom caps as bases for grain-free Haunted Mini Pizzas that fit ketogenic lifestyles perfectly.
Gluten-Free: Choose certified gluten-free English muffins, tortillas, or make mini crusts from gluten-free flour blends. Many brands now offer products virtually indistinguishable from traditional versions.
Dairy-Free/Vegan: Replace cheese with plant-based alternatives (cashew-based mozzarella melts particularly well) and ensure your sauce contains no hidden dairy ingredients for Halloween fun everyone can enjoy.
Vegetarian: These Haunted Mini Pizzas are naturally vegetarian when made with veggie toppings, making them perfect for mixed-diet households where not everyone eats the same way.
Global Flavors
Mediterranean Style: Use hummus instead of pizza sauce, top with feta cheese, kalamata olives, sun-dried tomatoes, and fresh oregano for Greek-inspired mini pizzas with completely different but equally delicious flavor profiles.
Mexican Fiesta: Swap pizza sauce for salsa or enchilada sauce, use pepper jack cheese, and top with black beans, corn, and jalapeños for south-of-the-border Haunted Mini Pizzas that bring new excitement.
Asian Fusion: Try teriyaki sauce as your base with mozzarella, edamame, bell peppers, and green onions for an unexpected twist that introduces kids to new flavors in a familiar format.
Italian Herb Garden: Focus on fresh herbs like basil, oregano, and thyme with traditional mozzarella and tomatoes for authentic Italian flavor that celebrates simple, quality ingredients.
Flavor Variations Comparison Table
| Variation Style | Base Sauce | Cheese Choice | Signature Toppings | Prep Time |
|---|---|---|---|---|
| Classic Haunted | Pizza/Marinara | Mozzarella | Olives, peppers, tomatoes | 15 mins |
| Spicy Halloween | Pizza + cayenne | Pepper jack | Jalapeños, hot honey drizzle | 15 mins |
| Keto Friendly | Sugar-free marinara | Full-fat mozzarella | Mushrooms, olives, low-carb veggies | 20 mins |
| Mediterranean | Hummus | Feta + mozzarella | Kalamata olives, sun-dried tomatoes | 15 mins |
| Mexican Fiesta | Salsa verde | Pepper jack | Black beans, corn, cilantro | 15 mins |
| Gluten-Free | Regular pizza sauce | Any cheese | Standard veggie toppings | 15 mins |
| Vegan Spooky | Dairy-free marinara | Cashew mozzarella | Unlimited veggie options | 15 mins |
Serving Suggestions for Haunted Mini Pizzas (H2)
Pair with simple side salads featuring mixed greens, cherry tomatoes, cucumbers, and a light vinaigrette to balance the richness of cheese and add nutritional variety to your meal.
Serve alongside vegetable sticks with ranch or hummus for dipping—carrots, celery, and bell pepper strips add crunch, color, and vitamins while kids are focused on their fun pizzas.
Include fruit skewers or cups for natural sweetness that cleanses the palate between pizza bites. Grapes, melon cubes, and strawberries work particularly well and add festive color.
Add soup for cooler evenings like tomato basil or minestrone that complements pizza flavors while warming everyone up during autumn and winter months when comfort food appeals most.
Create a mini pizza bar for parties where guests build their own spooky creations. Set out bases, sauce, cheese, and various toppings with example photos for inspiration, turning dinner into interactive entertainment.
Beverage pairings: Serve with sparkling apple cider, orange juice, or flavored seltzers for kid-friendly options that feel special. Adults might enjoy craft root floats or seasonal beverages.
Dessert pairing: Follow Haunted Mini Pizzas with simple treats like apple slices with caramel dip or Halloween-themed cookies to complete your spooky-themed meal without overwhelming already-full bellies.

FAQs About Haunted Mini Pizzas (H2)
Can I use frozen pizza dough for Haunted Mini Pizzas? Absolutely! Roll thawed frozen dough to ¼-inch thickness, cut into 4-inch circles with a biscuit cutter, and proceed with the recipe. This option provides homemade taste with convenience, though it adds about 15 minutes to prep time for rolling and cutting.
How do I prevent toppings from falling off my Haunted Mini Pizzas? The secret is strategic layering: apply a base cheese layer first, add your decorative toppings, then sprinkle a light final cheese layer over everything. This “cheese sandwich” method secures decorations in place while baking. Also, avoid overloading with toppings, which causes instability.
Can I make Haunted Mini Pizzas ahead of time? Yes! Assemble completely, cover tightly with plastic wrap, and refrigerate for up to 24 hours before baking. You can also freeze assembled unbaked pizzas for up to 3 months. Bake directly from frozen, adding 3-5 extra minutes to cooking time for perfect results.
What’s the best way to get kids involved in making Haunted Mini Pizzas? Give each child their own workspace with pre-toasted bases and small bowls of toppings. Let them design their own spooky faces without correction—the creativity and ownership they feel makes them more likely to eat and enjoy their creations. Younger kids can handle placing pre-cut toppings while older children can help with slicing vegetables.
Are Haunted Mini Pizzas healthy? They can be! Use whole wheat English muffins for extra fiber, load up on vegetable toppings, use part-skim mozzarella, and apply cheese moderately. The beauty of mini pizzas is portion control—each person gets a satisfying individual serving rather than mindlessly eating multiple slices.
How do I fix burnt edges on my Haunted Mini Pizzas? Prevention is key: cover edges loosely with foil strips during baking if they brown too quickly, or reduce oven temperature by 25°F and bake slightly longer. If edges do burn, simply trim them off with kitchen shears before serving.
Can toddlers eat Haunted Mini Pizzas safely? Yes, with modifications! Cut pizzas into small, manageable pieces, ensure all toppings are soft and age-appropriate (avoid choking hazards like whole olives), and always supervise young children while eating. Mini pizzas are actually excellent for toddlers learning self-feeding skills.
What should I do if my mini pizzas turn out soggy? If you’re consistently getting soggy results, try these fixes: toast bases longer before topping, reduce sauce amount significantly, pat all vegetables dry thoroughly before using, and increase oven temperature by 25°F while reducing baking time slightly. You might also try a pizza stone for superior crisping.
Can I make Haunted Mini Pizzas in an air fryer? Definitely! Air fryers work wonderfully for small batches. Preheat to 375°F, arrange mini pizzas in a single layer without touching, and cook for 5-7 minutes until cheese melts and bubbles. Work in batches to avoid overcrowding, which affects air circulation and even cooking.
How many Haunted Mini Pizzas should I plan per person? Plan for 2-3 mini pizzas per adult and 1-2 per child, depending on appetite and what else you’re serving. Kids often want seconds, so making extras is wise. They’re easy to freeze if you overestimate, so err on the side of abundance rather than running short.
Conclusion
These Haunted Mini Pizzas have transformed countless ordinary weeknights into memorable family experiences in kitchens across the country, and now they can do the same for you! From their crispy, perfectly toasted bases to their creative, customizable spooky designs, these mini pizzas deliver everything busy families need: speed, affordability, nutrition, and most importantly, fun that brings everyone together.
The beauty of this recipe lies in its flexibility—whether you’re feeding picky toddlers, accommodating dietary restrictions, or hosting a Halloween party for twenty, these Haunted Mini Pizzas adapt to your needs without complicated techniques or expensive ingredients. You’ve learned how to choose the perfect base, master quick assembly methods, create various flavor profiles, and troubleshoot common issues, giving you complete confidence to make this recipe your own.
At Recipesrealm, we’re passionate about recipes that create memories and bring joy to your kitchen, and these mini pizzas embody that mission perfectly. I’ve watched my own children grow from needing help placing toppings to creating elaborate edible artwork, and I’ve seen the pride on their faces when they serve their spooky creations to family and friends. That’s what cooking together is all about—building skills, confidence, and lasting memories one delicious meal at a time.
Fire up your oven tonight and try these Haunted Mini Pizzas with your family! Join the thousands of home cooks who’ve made this their go-to quick dinner solution, and discover how something so simple can bring so much happiness. Don’t forget to try our Quick Savory Halloween Snack – Creepy-Cute Mummy Brie I’d love to see the spooky masterpieces you create!
If you loved this recipe, don’t forget to share it with your friends or save it to try later! I’d be thrilled to see your personal touch—share your photos on Pinterest!
Print
Quick Family Dinner Idea – Haunted Mini Pizzas
- Total Time: 20
- Yield: 12 1x
- Diet: Vegetarian
Description
Quick and fun Haunted Mini Pizzas perfect for family dinners! These spooky-themed personal pizzas are ready in 20 minutes with customizable toppings that kids love. Crispy bases topped with melted cheese and creative Halloween decorations make weeknight dinners exciting and delicious.
Ingredients
6 English muffins, split in half (or 12 mini bagels)
1 cup pizza sauce or marinara
2 cups shredded mozzarella cheese
½ cup shredded cheddar cheese
¼ cup grated Parmesan cheese
1 can (6 oz) sliced black olives
1 red bell pepper, sliced into strips
1 yellow bell pepper, sliced into strips
8 cherry tomatoes, halved
4 mushrooms, sliced
4 string cheese sticks, pulled apart
1 tablespoon Italian seasoning
1 teaspoon garlic powder
2 tablespoons olive oil
Fresh basil leaves (optional, for garnish)
Instructions
1. Preheat oven to 425°F and line two large baking sheets with parchment paper.
2. Arrange English muffin halves cut-side up on prepared baking sheets, spacing 1 inch apart.
3. Toast bare muffins in preheated oven for 3-4 minutes until just beginning to firm up.
4. Remove from oven and let cool for 2 minutes. Meanwhile, prepare all toppings and organize in small bowls.
5. Spread 1-2 tablespoons pizza sauce on each toasted muffin half, leaving a small border around edges.
6. Sprinkle a generous layer of mozzarella cheese over the sauce (about 2-3 tablespoons per mini pizza).
7. Create spooky faces and designs using black olive slices, bell pepper strips, tomatoes, and other prepared toppings. Get creative with ghost faces, jack-o’-lanterns, mummies, and spiders!
8. Sprinkle remaining cheddar and Parmesan cheese lightly over decorations to secure toppings.
9. Bake in 425°F oven for 10-12 minutes, rotating sheets halfway through, until cheese is fully melted, bubbly, and beginning to turn golden.
10. Remove from oven and let rest for 2-3 minutes before serving.
11. Transfer carefully to serving plates using a wide spatula and enjoy your spooky creations!
Notes
Toast the bases before topping to prevent soggy pizzas—this is the most important step!
Use sauce sparingly; too much creates sogginess and causes toppings to slide off.
Pat wet ingredients like olives and tomatoes dry with paper towels before using.
For meal prep: Assemble unbaked pizzas, freeze on baking sheets until solid, then transfer to freezer bags for up to 3 months. Bake directly from frozen, adding 3-5 minutes to cooking time.
Make it kid-friendly by letting each child design their own mini pizza with their favorite toppings.
Substitute bases: Try mini bagels, tortillas, flatbreads, or even portobello mushroom caps for low-carb options.
Storage: Refrigerate leftovers in an airtight container for up to 3 days. Reheat in a 375°F oven for 5-7 minutes.
- Prep Time: 10
- Cook Time: 10
- Category: Dinner
- Method: Baking
- Cuisine: American
Nutrition
- Serving Size: 2 mini pizzas
- Calories: 285
- Sugar: 4g
- Sodium: 620mg
- Fat: 12g
- Saturated Fat: 6g
- Unsaturated Fat: 5g
- Trans Fat: 0g
- Carbohydrates: 32g
- Fiber: 3g
- Protein: 14g
- Cholesterol: 28mg
Keywords: haunted mini pizzas, halloween pizzas, kid-friendly dinner, quick family meal, mini pizzas, easy weeknight dinner