
Are you tired of dense, overly sweet chocolate cakes that leave you feeling disappointed? This chocolate mousse cake is about to change everything you thought you knew about chocolate desserts. Light as air yet intensely rich, this showstopper dessert combines the best of both worlds—a delicate mousse texture with deep, luxurious chocolate flavor.
Hi there! I’m Lisa, the heart and soul behind Recipesrealm. I still remember the first time I attempted a chocolate mousse cake in my tiny apartment kitchen. It was for my best friend’s birthday, and let me tell you, the first attempt was a disaster—deflated, grainy, and nothing like the elegant dessert I’d envisioned. But after years of perfecting this recipe and countless taste tests (my family didn’t complain!), I’ve finally cracked the code. This chocolate mousse cake has become my signature dessert, the one everyone requests at gatherings, and I’m thrilled to share every secret with you today.
In this comprehensive guide, you’ll discover everything you need to know: selecting the finest chocolate, mastering the mousse technique, assembling your cake like a professional pastry chef, and troubleshooting common issues. Whether you’re planning an intimate dinner party or a grand celebration, this dessert will steal the show.
Why This Chocolate Mousse Cake Recipe Works
This chocolate mousse cake isn’t just another dessert recipe—it’s a carefully crafted formula for success that delivers restaurant-quality results in your own kitchen. Here’s why home bakers and dessert enthusiasts absolutely love this recipe:
- Uses premium yet affordable chocolate that you can find at any grocery store, no specialty shops required
- No-bake mousse layers mean you can prepare this stunning dessert even without advanced baking skills
- Make-ahead friendly allowing you to prepare components up to two days in advance, perfect for stress-free entertaining
- Customizable flavor profiles from classic dark chocolate to white chocolate raspberry variations
- Feeds a crowd with one cake serving 10-12 people generously, making it ideal for celebrations
- Achieves that coveted silky texture through a foolproof technique that prevents graininess every single time
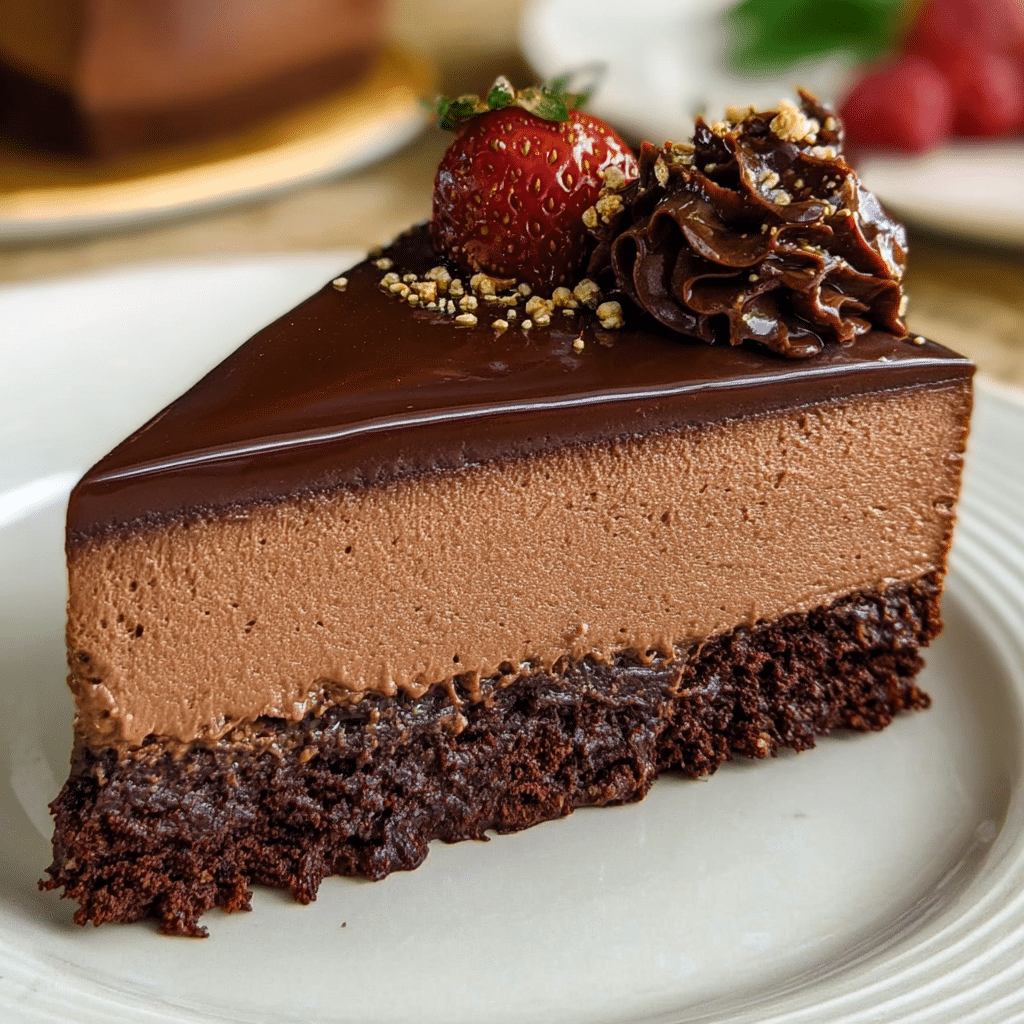
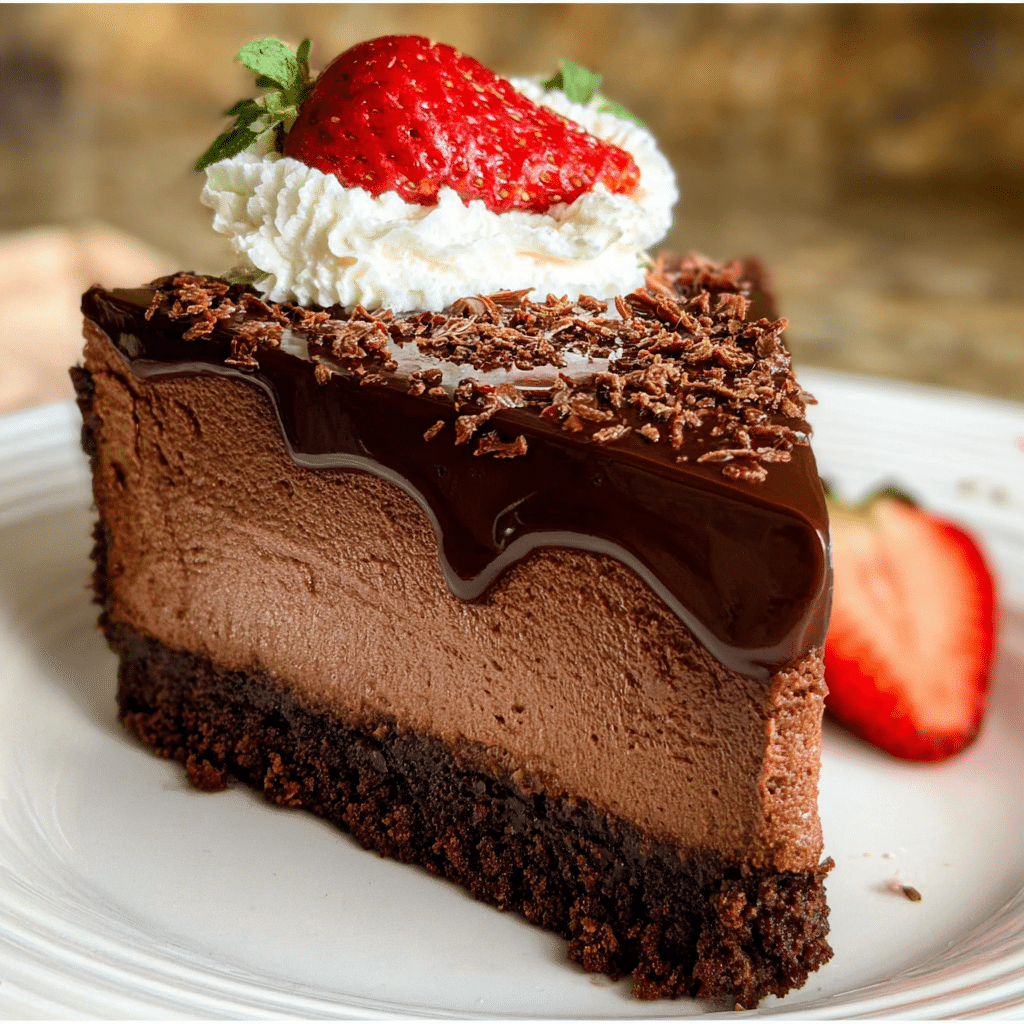
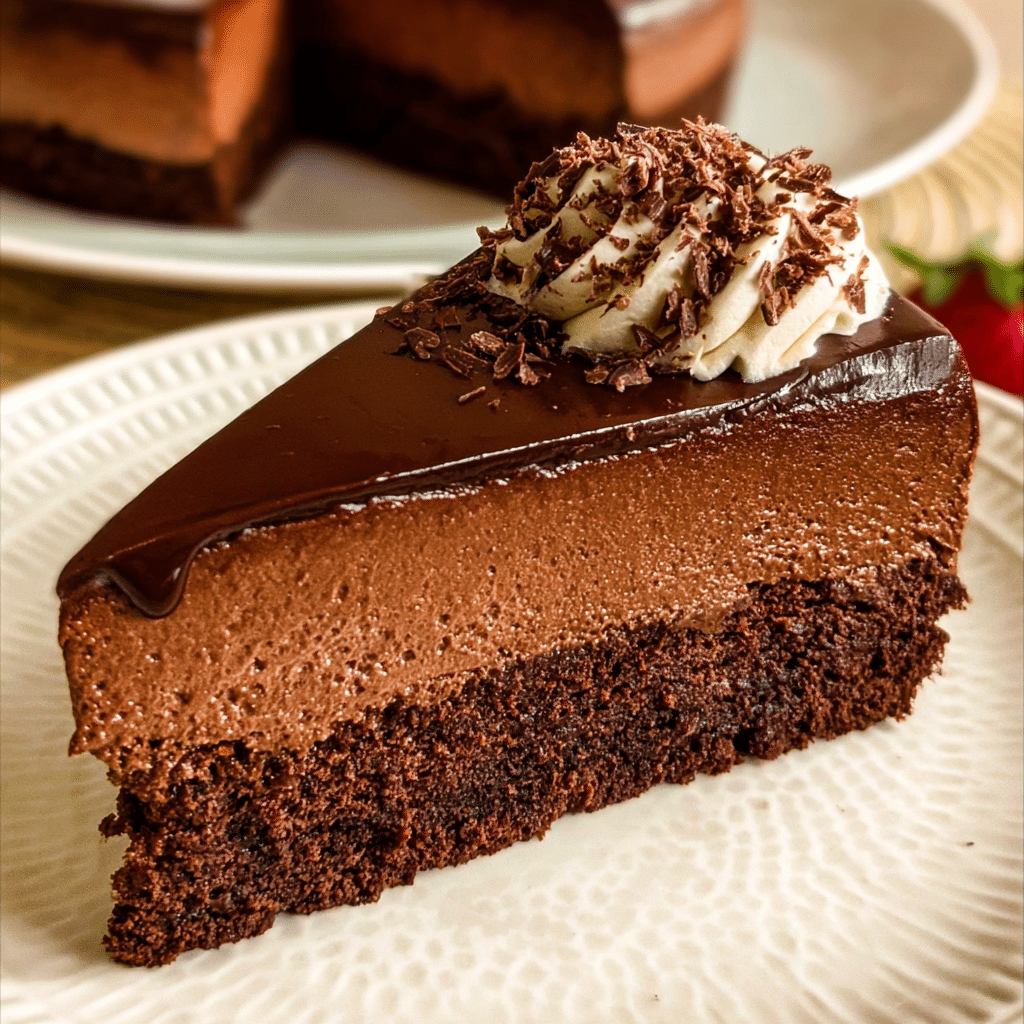
The magic of this chocolate mousse cake lies in its three distinct layers: a crisp chocolate cookie base, a velvety mousse center, and a glossy ganache topping. Each component complements the others, creating a symphony of textures and flavors that’s simply irresistible.
Choosing the Right Chocolate for Your Chocolate Mousse Cake
The foundation of any exceptional chocolate mousse cake is, without question, the chocolate itself. This isn’t the time to grab whatever’s on sale—quality chocolate makes or breaks this dessert.
Best Chocolate Types for This Recipe
For the mousse layer, I exclusively use dark chocolate with 60-70% cacao content. This range provides the perfect balance—rich enough to deliver that deep chocolate flavor we crave, but not so bitter that it overwhelms the palate. Brands like Ghirardelli, Lindt, or Guittard work beautifully and are readily available.
For the ganache topping, you can use the same 60-70% dark chocolate, or if you prefer something slightly sweeter, opt for semi-sweet chocolate chips (around 50-60% cacao). The choice here depends on your personal preference and your guests’ tastes.
The cookie base is flexible—you can use store-bought chocolate sandwich cookies or chocolate graham crackers. If you’re feeling ambitious, homemade chocolate shortbread adds an incredible buttery dimension.
Buying Tips for Quality Chocolate
When shopping for chocolate for your chocolate mousse cake, look for these indicators of quality:
- Ingredient list should be short: Cocoa mass, sugar, cocoa butter, and lecithin (emulsifier) should be the main components
- Avoid “chocolate-flavored” products: These contain oils and additives that won’t melt properly
- Check the appearance: Quality chocolate has a smooth, glossy surface without white streaks or spots (which indicate bloom)
- Shop the baking aisle: Chocolate bars and baking discs typically have better melting properties than chocolate chips for candy-making
Chocolate Substitutions and Alternatives
While I developed this recipe with dark chocolate in mind, you have options:
- Milk chocolate variation: Replace dark chocolate with quality milk chocolate (35-45% cacao) for a sweeter, creamier chocolate mousse cake—just reduce added sugar by 25%
- White chocolate twist: Use white chocolate for an elegant ivory-colored mousse, though you’ll need to add vanilla extract for depth
- Mixed chocolate layers: Create a stunning ombré effect by making one layer with dark chocolate and another with milk chocolate
- Sugar-free option: Premium sugar-free dark chocolate works, though the texture may be slightly less creamy
Ingredients & Prep for Your Chocolate Mousse Cake
Creating the perfect chocolate mousse cake requires careful preparation and quality ingredients. Here’s everything you’ll need, organized by component.
Essential Ingredients Checklist
For the Cookie Base:
- 2 cups chocolate sandwich cookie crumbs (about 24 cookies)
- 5 tablespoons unsalted butter, melted
- 2 tablespoons granulated sugar
- Pinch of salt
For the Chocolate Mousse:
- 12 ounces dark chocolate (60-70% cacao), finely chopped
- 3 cups heavy whipping cream, divided
- 4 large eggs, separated
- 1/3 cup granulated sugar
- 2 teaspoons pure vanilla extract
- 1/4 teaspoon cream of tartar
- Pinch of salt
For the Ganache Topping:
- 8 ounces dark chocolate, finely chopped
- 1 cup heavy cream
- 2 tablespoons unsalted butter
- 1 tablespoon corn syrup (for shine)
Optional Garnishes:
- Fresh berries (strawberries, raspberries)
- Chocolate shavings or curls
- Edible gold leaf
- Whipped cream rosettes
- Fresh mint leaves
Mousse Preparation Essentials
The key to an ethereal chocolate mousse cake lies in proper preparation techniques:
Temperature Management: All ingredients should start at room temperature except the heavy cream, which should be cold. Remove eggs from the refrigerator 30 minutes before starting. Room temperature eggs whip to greater volume and incorporate more smoothly.
Chocolate Melting Method: Use a double boiler or microwave in 30-second intervals, stirring between each. The chocolate should reach 110-115°F—warm enough to remain fluid but cool enough not to scramble the eggs when combined.
Whipping Cream Properly: Chill your mixing bowl and whisk attachment for 15 minutes before whipping cream. This ensures maximum volume and stable peaks. Whip to soft peaks only—overwhipped cream will make your mousse grainy.
Egg White Technique: Ensure your bowl and whisk are completely grease-free. Even a trace of oil will prevent proper whipping. Add cream of tartar to stabilize the whites, then gradually add sugar for glossy, stable meringue peaks.
Pantry Staples and Special Tools
Beyond the main ingredients, you’ll need:
- Unflavored gelatin (optional, for extra stability in warm weather)
- Instant coffee powder (1 teaspoon enhances chocolate flavor without adding coffee taste)
- High-quality vanilla extract (never imitation)
- Dutch-process cocoa powder for dusting
Essential Equipment:
- 9-inch springform pan
- Electric mixer (stand or hand)
- Double boiler or heatproof bowl
- Rubber spatula
- Offset spatula
- Instant-read thermometer
- Parchment paper
- Plastic wrap
Step-by-Step Cooking Instructions for Chocolate Mousse Cake
Follow these detailed steps to create your masterpiece chocolate mousse cake. Take your time—rushing is the enemy of perfect mousse.
Pre-Cooking Prep for Chocolate Mousse Cake
Step 1: Prepare Your Workspace Line a 9-inch springform pan with parchment paper on the bottom and lightly grease the sides. This ensures easy removal later. Set up all your tools within arm’s reach—once you start working with mousse, timing matters.
Step 2: Make the Cookie Base Pulse chocolate sandwich cookies in a food processor until you have fine, uniform crumbs. In a medium bowl, combine the crumbs with melted butter, sugar, and salt. The mixture should hold together when squeezed. Press firmly into the bottom of your prepared pan, using the bottom of a measuring cup to create an even layer. Refrigerate while you prepare the mousse—a cold base prevents the mousse from soaking in.
Step 3: Bring Ingredients to Proper Temperature Set out eggs and separate them while cold (they separate more cleanly), then let whites and yolks come to room temperature in separate bowls. Measure your heavy cream and keep two cups refrigerated for whipping later. One cup can be at room temperature for the chocolate mixture.
Cooking Method for Chocolate Mousse Cake
Step 4: Melt the Chocolate Place chopped chocolate in a heatproof bowl over barely simmering water (double boiler method). Stir constantly until smooth and melted, reaching 110°F. Remove from heat immediately. Alternatively, microwave in 30-second bursts, stirring between each, until just melted. Let cool slightly while you prepare other components.
Step 5: Create the Chocolate Base Warm 1 cup of heavy cream until steaming but not boiling (about 180°F). Whisk the egg yolks until smooth, then slowly drizzle in the warm cream while whisking constantly—this tempers the eggs, preventing scrambling. Pour this custard into the melted chocolate and whisk until completely smooth and glossy. Add vanilla extract. This is your chocolate base. Set aside to cool to room temperature, stirring occasionally.
Step 6: Whip the Cream In a chilled bowl with chilled beaters, whip the remaining 2 cups of cold heavy cream until soft peaks form. The cream should hold its shape but still have a slight droop at the tip. Transfer to a separate bowl and refrigerate.
Step 7: Whip the Egg Whites In a spotlessly clean bowl, beat egg whites with cream of tartar on medium speed until foamy. Gradually add sugar, one tablespoon at a time, then increase speed to high. Beat until stiff, glossy peaks form—when you lift the whisk, peaks should stand straight up. This takes about 4-5 minutes. Don’t overbeat or they’ll become dry and grainy.
Step 8: Fold Everything Together This step makes or breaks your chocolate mousse cake. First, fold one-third of the whipped cream into the chocolate base to lighten it. Use a rubber spatula and gentle folding motions—cutting down through the center, sweeping across the bottom, and up the sides. Rotate the bowl as you fold. Next, fold in half the egg whites using the same gentle technique. Finally, fold in the remaining whipped cream and egg whites alternately until no white streaks remain. Work quickly but gently—you want to maintain all that air you’ve incorporated.
Doneness Check for Chocolate Mousse Cake
Unlike traditional baking, there’s no internal temperature to check here. Your chocolate mousse cake mousse is “done” when:
- The mixture is completely homogeneous with no white streaks
- It holds soft peaks when you lift the spatula
- The texture is fluffy and cloud-like, not dense
- The color is uniform throughout
Pour the mousse over your chilled cookie base immediately. Use an offset spatula to smooth the top into an even layer. Tap the pan gently on the counter a few times to release any air bubbles.
Resting Period for Chocolate Mousse Cake
This is crucial: your chocolate mousse cake needs proper chilling time to set. Cover the pan loosely with plastic wrap, making sure it doesn’t touch the mousse surface. Refrigerate for at least 6 hours, but preferably overnight (8-12 hours). During this time, the mousse firms up, the flavors meld, and the texture becomes perfectly sliceable.
After the initial set, prepare your ganache topping. Heat 1 cup of heavy cream until just simmering. Pour over 8 ounces of chopped chocolate and let sit for 2 minutes. Stir until smooth, then whisk in butter and corn syrup. Let cool to room temperature (about 20 minutes), stirring occasionally, until it reaches a thick but pourable consistency.
Pour the ganache over the chilled mousse layer, using an offset spatula to spread it to the edges. Return to the refrigerator for another 2-3 hours until the ganache is set.
Pro Tips for Perfect Chocolate Mousse Cake
After making this chocolate mousse cake hundreds of times, I’ve learned every trick in the book. Here are the secrets that separate good from extraordinary.
Avoiding Common Chocolate Mousse Cake Mistakes
Problem: Grainy, Separated Mousse This happens when chocolate is too hot when mixed with eggs or cream. Always let melted chocolate cool to 110°F or below before combining with other ingredients. If your mixture does separate, whisk in a tablespoon of cold cream—the shock often brings it back together.
Problem: Deflated, Dense Texture Overmixing after adding egg whites is the culprit. Those delicate air bubbles collapse with too much handling. Fold just until combined—a few small white streaks are preferable to an overmixed mousse. Also, ensure your egg whites were beaten to proper stiff peaks before folding.
Problem: Mousse Won’t Set This usually means insufficient chilling time or too warm a refrigerator. Your fridge should be at 35-38°F. If you’re in a hurry, place the chocolate mousse cake in the freezer for 2-3 hours instead of refrigerating overnight.
Problem: Cracked Ganache Top Ganache that’s too cold when poured, or cutting the cake before it’s fully set, causes cracks. Always let ganache cool to room temperature (it should flow slowly off a spoon) before pouring. When cutting, dip your knife in hot water and wipe dry between each slice.
Essential Tool Recommendations for Chocolate Mousse Cake
Investing in proper tools makes creating this chocolate mousse cake infinitely easier:
Springform Pan: A 9-inch pan with a tight seal prevents leaks. I prefer the ones with a glass bottom for elegant presentation. Always wrap the outside in aluminum foil as insurance against drips.
Stand Mixer: While you can make this with a hand mixer, a stand mixer frees your hands for other tasks and provides more consistent results. The whisk attachment is essential for proper egg white volume.
Offset Spatula: This angled tool is crucial for smoothing ganache and getting clean edges. A 6-inch offset spatula is the perfect size for a 9-inch cake.
Instant-Read Thermometer: Takes the guesswork out of chocolate temperature. The ThermoWorks ThermoPop is affordable and accurate.
Microplane Grater: For creating beautiful chocolate shavings as garnish. Hold the chocolate at an angle and use light, sweeping strokes.
Storage & Reheating Your Chocolate Mousse Cake
This chocolate mousse cake is actually better the second day as flavors develop. Here’s how to store it properly:
Short-Term Storage (3-4 days): Keep the cake in its springform pan, covered loosely with plastic wrap, in the refrigerator. The springform protects the delicate sides. Remove 15 minutes before serving for best texture.
Freezing Individual Slices: Cut the cake, then wrap each slice individually in plastic wrap, followed by aluminum foil. Freeze for up to 2 months. Thaw overnight in the refrigerator. This is perfect for portion control or surprise desserts.
Freezing Whole Cake: Remove from springform pan, wrap entire cake in plastic wrap, then aluminum foil. Freeze up to 1 month. Thaw in refrigerator for 24 hours before serving.
Pro Storage Tip: Place a piece of parchment between the cake and plastic wrap to prevent the wrap from sticking to the ganache and marring its glossy surface.
Flavor Variations for Chocolate Mousse Cake
Once you’ve mastered the classic chocolate mousse cake, the world of flavor possibilities opens wide. Here are my favorite tested variations.
Espresso Chocolate Mousse Cake
Add 2 tablespoons of instant espresso powder to the warm cream when making the chocolate base. The coffee amplifies the chocolate flavor dramatically without making it taste like coffee. For an extra kick, brush the cookie base with coffee liqueur before adding the mousse.
Mint Chocolate Mousse Cake
Reduce vanilla extract to 1 teaspoon and add 1 teaspoon of pure peppermint extract to the mousse. Fold in 1/2 cup of finely chopped dark chocolate mint thins. Top the ganache with crushed peppermint candies for a festive touch.
Orange Chocolate Mousse Cake
Add the zest of 2 large oranges to the chocolate base along with 1 tablespoon of orange liqueur (or orange juice concentrate for non-alcoholic). Use chocolate graham crackers for the base. Garnish with candied orange peel.
Salted Caramel Chocolate Mousse Cake
Drizzle 1/2 cup of cooled salted caramel sauce over the cookie base before adding mousse. Swirl an additional 1/4 cup through the mousse using a knife. Sprinkle flaky sea salt over the ganache before it sets.
Raspberry White Chocolate Mousse Cake
Replace dark chocolate with quality white chocolate. Fold 1 cup of fresh or frozen (thawed and drained) raspberries into the mousse. Layer raspberry preserves between the base and mousse. Top with fresh raspberries and white chocolate curls.
Global Flavor Inspirations
Mexican Chocolate: Add 1 teaspoon cinnamon and 1/4 teaspoon cayenne pepper to the chocolate base for a spicy kick.
Italian Tiramisu Style: Soak the cookie base with strong espresso and add 8 ounces mascarpone cheese to the mousse (reduce cream by 1/2 cup). Dust with cocoa powder instead of ganache.
French Orange Blossom: Add 1 tablespoon orange blossom water to the mousse and garnish with edible flowers.
Flavor Variation Comparison Table
| Variation | Key Addition | Best Season | Difficulty Level | Guest Rating |
|---|---|---|---|---|
| Classic Dark Chocolate | None | Year-round | Easy | 9.5/10 |
| Espresso | 2 tbsp instant espresso | Year-round | Easy | 9.8/10 |
| Mint | 1 tsp peppermint extract | Winter/Holidays | Easy | 9.0/10 |
| Orange | Orange zest + liqueur | Winter/Spring | Medium | 9.3/10 |
| Salted Caramel | Caramel sauce + sea salt | Fall/Winter | Medium | 9.7/10 |
| Raspberry White | White chocolate + raspberries | Spring/Summer | Medium | 9.2/10 |
| Mexican Spiced | Cinnamon + cayenne | Fall | Easy | 8.8/10 |
| Tiramisu | Espresso + mascarpone | Year-round | Hard | 9.5/10 |
Serving Suggestions for Your Chocolate Mousse Cake
Presentation elevates your chocolate mousse cake from delicious to unforgettable. Here’s how to serve it like a professional pastry chef.
Plating and Garnishing
The Perfect Slice: Run a thin knife under hot water, wipe dry, then make one smooth cut through the cake. Clean the knife between each slice. This prevents dragging mousse through the layers and gives you clean, professional edges.
Garnish Ideas:
- Fresh Berries: A handful of mixed berries (strawberries, raspberries, blackberries) adds color and cuts the richness
- Chocolate Curls: Use a vegetable peeler on a room-temperature chocolate bar, letting curls fall naturally
- Gold Leaf: A small piece of edible gold leaf makes this chocolate mousse cake worthy of any special occasion
- Whipped Cream: A dollop of vanilla whipped cream provides textural contrast
- Cocoa Dusting: A light dusting of cocoa powder through a fine-mesh strainer adds elegance
- Fresh Mint: A small sprig adds a pop of color and hints at the freshness within

Side Dish Pairings
While this chocolate mousse cake is stunning on its own, certain accompaniments enhance the experience:
Fresh Fruit Compote: A warm mixed berry compote with a touch of balsamic vinegar cuts through the richness beautifully. The acidity balances the sweet chocolate.
Vanilla Bean Ice Cream: The cold, creamy vanilla provides temperature contrast and a classic pairing. Let it melt slightly into the mousse for a luscious experience.
Crème Anglaise: A pool of vanilla custard sauce on the plate beneath the slice adds restaurant-quality elegance.
Raspberry Coulis: A vibrant red sauce drizzled artistically around the plate adds visual drama and fruity notes.
Candied Nuts: A small pile of candied pecans or hazelnuts adds crunch and sophistication.
Beverage Pairings
The right beverage transforms your chocolate mousse cake experience:
Coffee: A rich espresso or dark roast coffee is the classic pairing. The bitter notes complement the sweet chocolate perfectly.
Hot Chocolate: Yes, chocolate on chocolate! A sophisticated dark hot chocolate with a hint of cinnamon creates a luxurious experience.
Milk: Sometimes simple is best. Cold whole milk is especially wonderful with the rich mousse.
Dessert Tea: Chocolate mint tea, vanilla rooibos, or Earl Grey all pair beautifully, with the bergamot in Earl Grey being particularly lovely.
Sparkling Water: A palate cleanser between bites, especially one with a hint of lemon or lime.
For special occasions when you want to elevate the experience, the richness of this chocolate mousse cake pairs wonderfully with a bold cup of coffee or a glass of cold milk.
FAQs About Chocolate Mousse Cake
After sharing this chocolate mousse cake recipe with thousands of home bakers, I’ve answered countless questions. Here are the most common concerns.
Can I make chocolate mousse cake without eggs? Yes! Replace the 4 eggs with 2 teaspoons of unflavored gelatin bloomed in 3 tablespoons of cold water, then melted. Your mousse will be slightly less airy but still delicious. Alternatively, use aquafaba (chickpea liquid)—3 tablespoons per egg white—whipped with cream of tartar.
How far in advance can I make chocolate mousse cake? This chocolate mousse cake is perfect for advance preparation. Make the entire cake up to 2 days ahead and store it covered in the refrigerator. The flavors actually improve after 24 hours. Add fresh garnishes just before serving.
Why is my chocolate mousse cake runny? If your mousse won’t set after 8 hours of chilling, the chocolate base was likely too warm when you folded in the whipped cream and egg whites, deflating them. Next time, let the chocolate mixture cool to room temperature before folding. As a fix, you can freeze the runny cake for 3-4 hours, which will firm it up enough to serve.
Can I use chocolate chips instead of chocolate bars? While possible, I don’t recommend it for this chocolate mousse cake. Chocolate chips contain stabilizers that prevent them from melting smoothly. If that’s all you have, look for “melting chocolate chips” which have a higher cocoa butter content. Otherwise, chocolate bars or baking discs work best.
Is raw egg in chocolate mousse cake safe? The eggs in this recipe are tempered with hot cream, which cooks them slightly. However, if you’re concerned about pregnant women, young children, elderly, or immunocompromised guests, use pasteurized eggs (available in cartons) or make the egg-free version.
How do I fix a cracked chocolate mousse cake? If your chocolate mousse cake cracks when removing from the springform, don’t panic! Simply warm the ganache slightly and pour a fresh thin layer over the top, spreading to cover cracks. Or embrace the rustic look and cover it with whipped cream and berries—no one will know.
Can I make mini chocolate mousse cakes? Absolutely! Use 4-inch springform pans or serving glasses. Reduce the base to 1/4 inch thick, use the same mousse recipe (it makes 8-10 minis), and top each with a small amount of ganache. Adjust chilling time to 4-5 hours.
What’s the difference between chocolate mousse and chocolate pudding? Chocolate pudding is cooked and thickened with cornstarch or eggs, giving it a dense, creamy texture. Chocolate mousse cake features mousse, which is aerated with whipped cream and egg whites, creating a light, airy texture. Mousse literally means “foam” in French.
Why does my chocolate mousse cake taste grainy? Graininess comes from: 1) Overwhipped cream (whip only to soft peaks), 2) Chocolate that seized (was exposed to water/steam), or 3) Overmixing the mousse. Always fold gently and minimally.
Can I make chocolate mousse cake dairy-free? Yes! Use full-fat coconut cream (chilled overnight, use only the solid part) in place of heavy cream. For ganache, use coconut cream or cashew cream. The texture will be slightly different but still delicious. Ensure your chocolate is dairy-free as well.
Conclusion
Creating a stunning chocolate mousse cake is easier than you ever imagined, and the rewards are extraordinary. From that first delicate forkful of cloud-like mousse to the rich ganache and crispy cookie base, every bite is a celebration of chocolate at its finest.
Remember, the secret to success lies in patience—letting your chocolate cool before folding, taking time to properly whip your egg whites and cream, and allowing adequate chilling time. These steps can’t be rushed, but the results are absolutely worth every minute.
This chocolate mousse cake has been the star of countless celebrations in my kitchen at Recipesrealm, from intimate anniversary dinners to festive birthday parties. I’ve watched as guests take their first bite, their eyes widening with delight, and I’ve heard the room go quiet as everyone savors this extraordinary dessert. That’s the magic of a perfectly executed mousse cake—it creates a moment of pure joy.
Don’t be intimidated by the multiple steps. Break the process into manageable parts: make your cookie base one day, prepare the mousse the next, and add the ganache on day three. Or tackle it all in one afternoon—either way, you’ll be rewarded with a dessert that looks and tastes like it came from a French patisserie.
Fire up your mixer, gather your finest chocolate, and try this chocolate mousse cake tonight! Your kitchen is about to become the neighborhood’s favorite dessert destination. Join the 5,000+ home cooks who’ve already fallen in love with this recipe and made it their signature dessert.
Looking for more chocolate inspiration? Try our Fall Dessert Trend: Mini Tres Leches Cakes next, or explore our Bite-Size Dessert Idea: Mini Fall Cheesecakes for more ways to celebrate this incredible ingredient. Every recipe at Recipesrealm is crafted with the same care and tested to perfection.
If you loved this recipe, don’t forget to share it with your friends or save it to try later! I’d be thrilled to see your personal touch—share your photos on Pinterest!
Print
Rich and Creamy Chocolate Mousse Cake
Description
This Rich and Creamy Chocolate Mousse Cake is a chocolate lover’s dream — with a velvety mousse layer, moist cake base, and silky ganache topping. Elegant, indulgent, and surprisingly easy to make!
Ingredients
**For the Cake Layer:**
1 cup all-purpose flour
1/2 cup cocoa powder
1 tsp baking powder
1/2 tsp salt
2 eggs
3/4 cup sugar
1/2 cup vegetable oil
1/2 cup milk
1 tsp vanilla extract
**For the Chocolate Mousse:**
1 1/2 cups heavy cream
1 cup semi-sweet chocolate chips
2 tbsp powdered sugar
1 tsp vanilla extract
**For the Ganache Topping:**
1/2 cup heavy cream
3/4 cup dark chocolate chips
Instructions
1. Preheat oven to 350°F (175°C). Grease and line a 9-inch springform pan.
2. In a bowl, whisk flour, cocoa powder, baking powder, and salt.
3. In another bowl, beat eggs, sugar, oil, milk, and vanilla until smooth. Gradually mix in dry ingredients.
4. Pour batter into the pan and bake for 20–25 minutes, or until a toothpick comes out clean. Let cool completely.
5. For the mousse, heat chocolate chips in a microwave-safe bowl until melted; cool slightly.
6. Whip heavy cream, powdered sugar, and vanilla until soft peaks form. Fold in melted chocolate gently until creamy and smooth.
7. Spread mousse evenly over the cooled cake and refrigerate for at least 2 hours.
8. To make ganache, heat heavy cream until hot (not boiling), pour over chocolate chips, and stir until glossy.
9. Pour ganache over the mousse layer, spreading evenly.
10. Refrigerate again for 1–2 hours before serving.
11. Slice, serve chilled, and enjoy this rich, dreamy dessert!
Notes
You can make the mousse a day in advance to save time.
For an extra touch, top with whipped cream, chocolate shavings, or berries.
Use high-quality chocolate for the best flavor and texture.